
Today I'm sharing a snowflake pattern which has six cats sitting and enjoying the winter weather! Cats use their tails to communicate and show what mood they are in so you can try shaping the tails by curling, straightening, or making them wavy.
The pattern has 7 rounds and the snowflake measures about 4".
___________________________________________________
This post contains affiliate links. If you choose to make a purchase I earn a small commission at no extra cost to you. Thank you for your support!
Frosty Tails Snowflake

Number of rounds- 7
Finished Size- 4"
Pattern is written using U.S. Terminology.
Materials Needed
Size 10 crochet thread- 20-30 yards
1.75 mm hook
Yarn needle
Scissors
Materials Needed for Blocking-
Rust proof pins
Liquid starch
Blocking mat
Stitch Abbreviations
ch- chain
hdc- half double crochet
dc- double crochet
FPdc- front post double crochet
FPsc- front post single crochet
sc- single crochet
slip st- slip stitch
st- stitch
yo- yarn over
Special Stitches
2-dc cluster- keeping last loop of each dc on hook, 2 dc in the ch-3 space indicated, yo and draw through all 3 loops on hook.
2-FPdc decrease- keeping last loop of each FPdc on hook, FPdc around each of next 2 FPdc indicated, yo and draw through all 3 loops on hook.
2-FPsc decrease-insert hook around the post of each of the next 2 FPdc indicated and pull up a loop, yo and draw through all 3 loops on hook.
Small picot- ch 2, slip st in second ch from hook.
Picot- ch 3, slip st in third ch from hook.
Large picot- ch 7, slip st in seventh ch from hook.
Pattern Notes
[ ] - work enclosed instructions the amount of times indicated, or work enclosed instructions in the stitch or space indicated.
★ - repeat the following instructions the amount of times indicated.
☾ and ❄ - Repeat from ☾ to ❄ the amount of times indicated.
( ) - Enclose additional information and the number of stitches at the end of a round.
Optional- If section is underlined it is optional to work the underlined FP st behind the previous FP stitch made.
Example- 2 FPdc around next FPdc, you should work the second FPdc behind the first FPdc made.
Symbol Key

Instructions
Repeat from ★ to ★ 5 times-
★ dc in foundation ch, ch 3 ★
Slip st in third ch of first dc.
(6 dc, 6 ch-3 spaces)

Round 2- Slip st into next ch-3 space, ch 2, dc in same ch-3 space (counts as first 2-dc cluster),
[hdc, 2-dc cluster] in same ch-3 space,
Repeat from ★ to ★ around-
★ Ch 3, in next ch-3 space work- [2-dc cluster, hdc, 2-dc cluster] ★
Ch 1, hdc in first dc to make last ch-3 space.
(12 2-dc clusters, 6 hdc, 6 ch-3 spaces)

Round 3- Ch 1, sc in same ch-3 space,
★ ☾ Ch 3, 2-FPdc decrease around next 2-dc cluster and next hdc, 2-FPdc decrease around same hdc and next 2-dc cluster, ch 3 ❄, sc in next ch-3 space ★
Slip st in first sc.
(12 2-FPdc decreases, 12 ch-3 spaces, 6 sc)

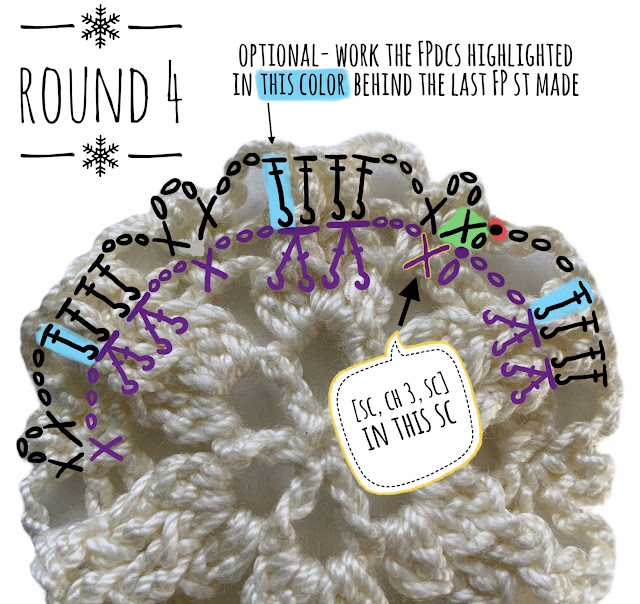
Round 4- Ch 1, [sc, ch 3] twice in same sc,
Repeat from ★ to ★ 5 times and from ☾ to ❄ once-
★ ☾ 2 FPdc around next 2-FPdc decrease, 2 FPdc around next 2-FPdc decrease, ch 3 ❄, [sc, ch 3] twice in next sc ★
Slip st in first sc.
Note- It is optional to work the underlined FPdc behind the last FP st made. This is to give the snowflake a more symmetrical look.
(12 sc, 18 ch-3 spaces, 24 FPdc)
Round 5- Slip st into next ch-3 space, ch 3 (counts as first dc), dc in same ch-3 space,
Repeat from ★ to ★ 5 times and from ☾ to ❄ once-
★ ☾ Ch 3, 2 FPdc around next FPdc, FPdc around each of next 2 FPdc, 2 FPdc around next FPdc, ch 3 ❄, skip next ch-3 space, 2 dc in next ch-3 space ★
Slip st in third ch of first dc.
(12 dc, 12 ch-3 spaces, 36 FPdc)

Round 6- Slip st in between same dc and next dc, ch 3 (counts as first dc), [dc, ch 2, 2 dc] in same space,
Repeat from ★ to ★ 5 times and from ☾ to ❄ once-
★ ☾ Ch 3, 2-FPdc decrease around next 2 FPdc, FPdc around each of next 2 FPdc, 2-FPdc decrease around next 2 FPdc, ch 3 ❄, in between next 2 dc work- [2 dc, ch 2, 2 dc] ★
Slip st in third ch of first dc.
(24 dc, 6 ch-2 spaces, 12 ch-3 spaces, 12 2-FPdc decreases, 12 FPdc)

Round 7- Ch 1, sc in same dc,
Repeat from ★ to ★ 5 times and from ☾ to ❄ once-
★ ☾ Small picot, sc in next dc,
in next ch-3 space work- [sc, picot, dc, large picot, ch 1, dc, picot, sc],
sc in next dc, small picot, sc in next dc, ch 2, sc in the next ch-3 space on Round 6 and the ch-3 space on Round 5 directly below together as 1 st, ch 2, 2-FPsc decrease around next 2 FPdc,
ch 10, slip st in second ch from hook, slip st in each of next 8 chs (tail made),
slip st in last 2-FPsc decrease made, ch 2,
sc in the next ch-3 space on Round 6 and the ch-3 space on Round 5 directly below together as 1 st,
ch 2 ❄, sc in next dc ★
Slip st in first sc, fasten off and weave in ends.
(48 sc, 12 small picots, 12 picots, 12 dc, 6 large picots, 48 ch-2 spaces, 6 2-FPsc decreases, 6 tails)
Slip st in first sc, fasten off and weave in ends.
(48 sc, 12 small picots, 12 picots, 12 dc, 6 large picots, 48 ch-2 spaces, 6 2-FPsc decreases, 6 tails)

Blocking and Finishing
It is optional but recommended to block your finished piece. Soak the snowflake in liquid starch or dilute with water if you prefer it to be lightly stiffened. Gently press out any excess liquid being careful not to pull or twist on the stitches. Lay it flat on a blocking mat and pin the snowflake working from the center out to the edges. Allow to dry completely before removing the pins.
Tip- To give the snowflake a different look you can shape the cat tails by curling, straightening, or making them wavy.


More snowflake patterns can be found here-
This pattern is by Julia Hart of Draiguna. Feel free to link to this pattern but do not reprint it onto your website. You can sell items made from this pattern. Please credit me as the designer, Julia Hart of Draiguna, link to my etsy shop- draiguna.etsy.com, or to my blog- www.draiguna.com. Please do not claim this pattern as your own, sell, or distribute it. This includes making charts, graphs, or videos. Thank you!
© 2022 Draiguna
Oh these are so fun! Thank you so much! Happy holidays! :D
ReplyDeleteFrosty Tails Snowflake is such a heartwarming title! It perfectly captures that cozy, wintry magic kids adore. Between juggling parenting and heavy coursework, I sometimes wish I’d used childcare assignment writing services just to have more time for storytelling. This piece truly reminds us why sparking a child’s imagination matters.
DeleteHi Julia, thank you so much for this gorgeous pattern. I've just made one and can't wait to block it.
ReplyDeleteI think I might have found an error in the written instructions:
In round 7 it says
"in next ch-3 space work- [sc, ch 3, picot, dc, large picot, ch 1, dc, picot, sc],"
I think the ch3 between the sc and picot shouldn't be there. It doesn't appear in the chart.
I'm also a little confused about the second half of the cat's rump. There's a nice 2-FPsc decrease around next 2 FPdc before the tail, but after the tail is it really just ch2? It looks in the chart like there's some decrease under the ch2 but I can't figure out how to do that.
That side of the cat rump is less tidy than the other.
Thanks again for a gorgeous pattern.
These are gorgeous and I can't wait to create some for my studio and next Christmas.
ReplyDeleteThis Christmas just passed I made more than 30 snowflakes from your heart pattern to send out with my Christmas cards. And my family and friends absolutely loved them. I can’t wait to send out snowflakes from this pattern for Christmas next year
ReplyDeleteI am also having difficulty with Round 7. Please, can you see if there's an error?
ReplyDeleteI think where people are getting mixed up with round 7 and the tails is here. There's the chain 2 to start, then the sc front post decrease, then the tail chain is next. After coming back down the tail chain you need to slip stitch back into the sc front post decrease and then chain 2 after that.
ReplyDeleteI think people are forgetting to slip stitch back first, it's like making a picot but with a long chain instead of a loop.
Love love love this! I finally made one that I'm going to gift to a friend who has a lot of cats :) Came out perfect and the directions were very clear, thank you so much!!
ReplyDeleteHi, I just wanted to ask if it's okay to post to Instagram with finished products (with pattern credits of course)?
ReplyDeleteSurviving the evaluation phase demands disciplined risk management, and Fundedfirm offers the ultimate clarity to keep you on the right path. Our innovative prop firm drawdown calculator lets you accurately track your equity peaks and daily limits without the stress of manual errors. By entering your starting balance and active trade parameters, you receive an immediate breakdown of your exact maximum allowable risk per session. Fundedfirm helps you focus purely on the charts rather than worrying about unexpected breaches or violations. Safeguard your funding status, optimize your position sizing, and conquer the global markets with absolute confidence.
ReplyDeleteprop firm drawdown calculator