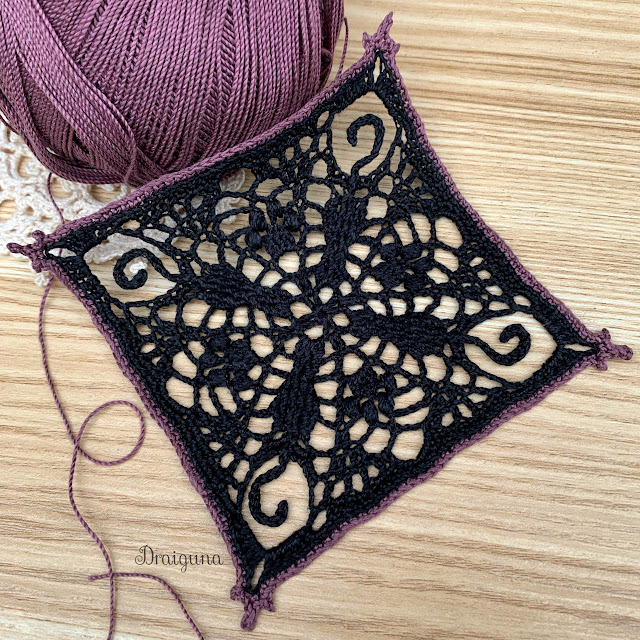
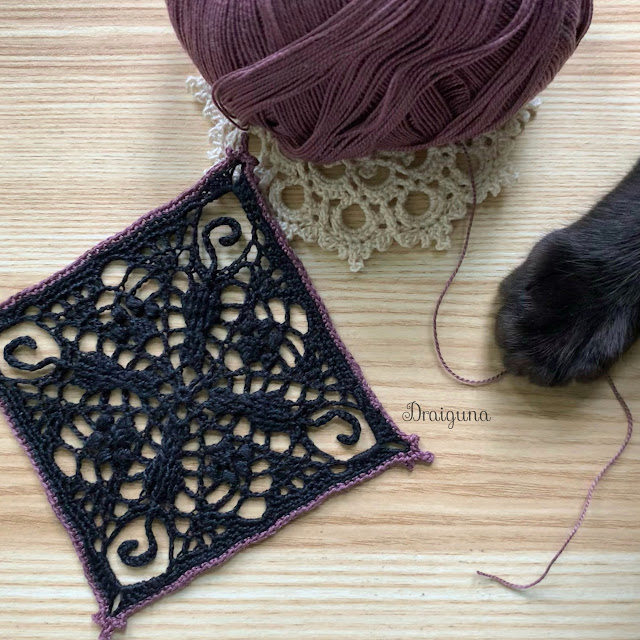
Happy Halloween! Today I'm sharing the pattern for the adorable Tails and Toe Beans Square. This square has 11 rounds and measures 4".
___________________________________________________
This post contains affiliate links. If you choose to make a purchase I earn a small commission at no extra cost to you. Thank you for your support!
Tails and Toe Beans Square
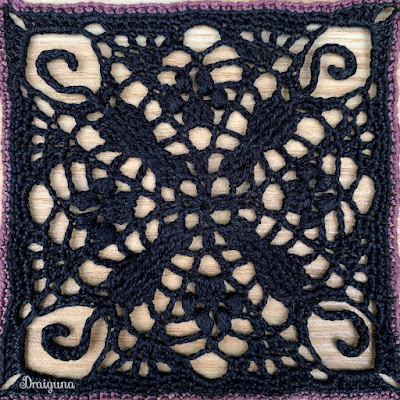
Number of rounds- 11
Finished Size- 4"
Pattern is written using U.S. Terminology.
Materials Needed
Size 10 crochet thread
Color 1- 40-50 yards
Color 2- 5-10 yards
1.75 mm hook
Yarn needle
Scissors
Materials Needed for Blocking-
Rust proof pins
Liquid starch
Blocking mat
Stitch Abbreviations
ch- chain
hdc- half double crochet
dc- double crochet
FPdc- front post double crochet
FPsc- front post single crochet
sc- single crochet
slip st- slip stitch
st- stitch
tr- treble crochet
yo- yarn over
Special Stitches
2-dc cluster- keeping last loop of each dc on hook, 2 dc in the ch-3 space indicated, yo and draw through all 3 loops on hook.
2-FPdc decrease- keeping last loop of each FPdc on hook, FPdc around each of next sts indicated, yo and draw through all 3 loops on hook.
2-FPsc decrease-insert hook around the post of each of the next 2 sts indicated and pull up a loop, yo and draw through all 3 loops on hook.
Puff stitch- [yo, insert hook into ch-2 space indicated, yo and pull up a loop] 3 times, yo and draw through 6 loops on hook, yo and draw through last 2 loops on hook.
Large puff stitch- [yo, insert hook into ch-2 space indicated, yo and pull up a loop] 4 times, yo and draw through 8 loops on hook, yo and draw through last 2 loops on hook.
Picot- ch 3, slip st in third ch from hook.
Large picot- ch 5, slip st in fifth ch from hook.
Pattern Notes
[ ] - work enclosed instructions the amount of times indicated, or work enclosed instructions in the stitch or space indicated.
★ - repeat the following instructions the amount of times indicated.
🐾 and ၇ - Repeat from 🐾 to ၇ the amount of times indicated.
( ) - Enclose additional information and the number of stitches at the end of a round.
Optional- If section is underlined it is optional to work the underlined FP st behind the previous FP stitch made.
Example- 2 FPdc around next FPdc, you should work the second FPdc behind the first FPdc made.
Symbol Key

Instructions
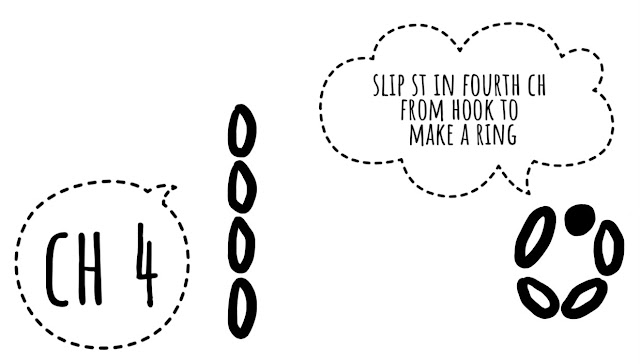
Ch 4, slip st in fourth ch from hook to make a ring.
Round 1- ch 3 (counts as first dc),
In ring work- {dc, ch 3, [2 dc, ch 3] 3 times}
Slip st in third ch of first dc.
(8 dc, 4 ch-3 spaces)

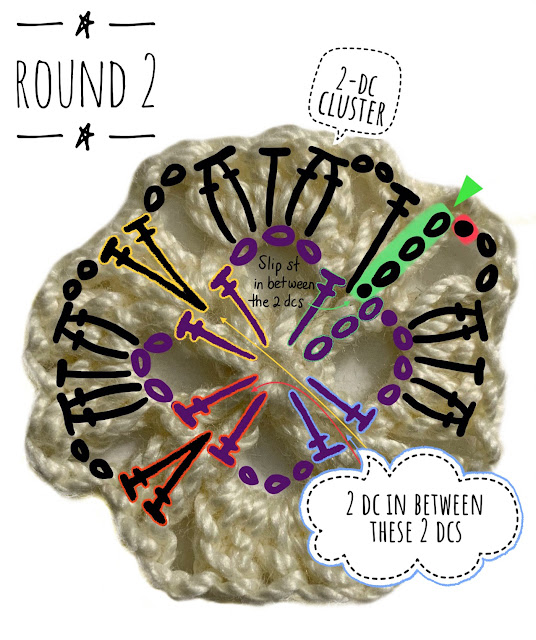
Round 2- Slip st in between same dc and next dc, ch 3 (counts as first dc), dc in same space,
Repeat from ★ to ★ 3 times and from 🐾 to ၇ once-
★🐾 ch 2, in next ch-3 space work- [2-dc cluster, hdc, 2-dc cluster], ch 2 ၇, 2 dc in between next 2 dc ★
★🐾 ch 2, in next ch-3 space work- [2-dc cluster, hdc, 2-dc cluster], ch 2 ၇, 2 dc in between next 2 dc ★
Slip st in third ch of first dc.
(8 dc, 8 ch-2 spaces, 8 2-dc clusters, 4 hdc)
Repeat from ★ to ★ 3 times and from 🐾 to ၇ once-
★🐾 2-FPdc decrease around next 2-dc cluster and next hdc, 2-FPdc decrease around same hdc and next 2-dc cluster, ch 3 ၇, [dc in next dc, ch 3] twice ★
Slip st in third ch of first dc.
(8 dc, 12 ch-3 spaces, 8 2-FPdc decreases)
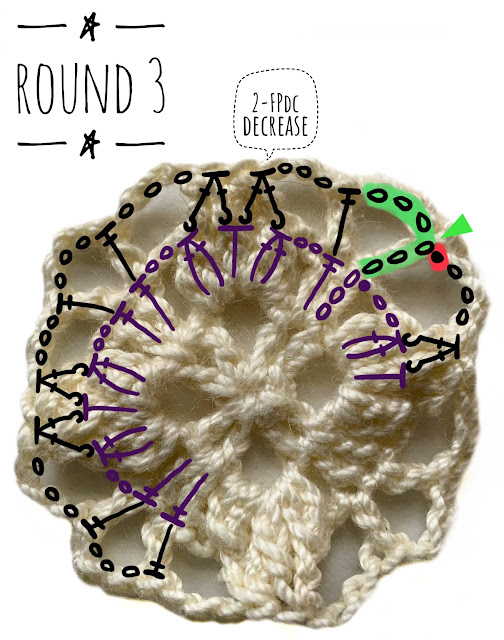
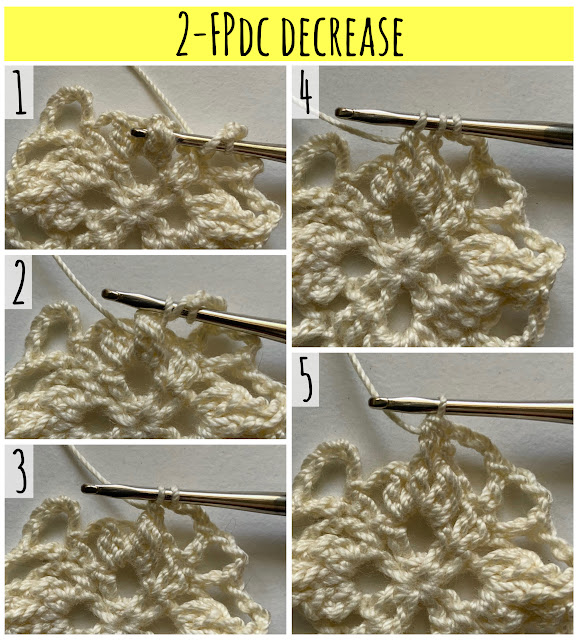 |
| 1- Yo and insert hook from front to back around the post of the 2-dc cluster indicated. 2- Yo and pull up a loop. 3- Yo and draw through 2 loops on the hook. 4- Yo and insert hook from front to back around the post of the next hdc indicated. Yo and pull up a loop, yo and draw through 2 loops on the hook. 5- Yo and draw through all 3 loops on the hook to complete the 2-FPdc decrease. |
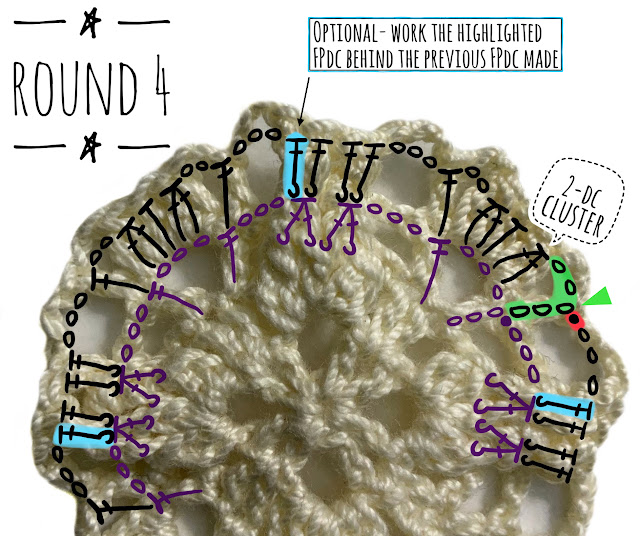
Round 4- Ch 5 (counts as first dc and ch-2 space),
Repeat from ★ to ★ 3 times and from 🐾 to ၇ once-
★🐾 In next ch-3 space work- [2-dc cluster, hdc, 2-dc cluster], ch 2, dc in next dc, ch 3, 2 FPdc around next 2-FPdc decrease, 2 FPdc around next 2-FPdc decrease, ch 3 ၇, dc in next dc, ch 2 ★
Slip st in third ch of first dc.
Note- It is optional to work the underlined FPdc behind the last FP st made. This is to give the snowflake a more symmetrical look.
(8 dc, 8 ch-2 spaces, 8 2-dc clusters, 4 hdc, 8 ch-3 spaces, 16 FPdc)
(8 dc, 8 ch-2 spaces, 8 2-dc clusters, 4 hdc, 8 ch-3 spaces, 16 FPdc)
Round 5- Ch 5 (counts as first dc and ch-2 space),
Repeat from ★ to ★ 3 times and from 🐾 to ၇ once-
★🐾Puff stitch in next ch-2 space, ch 2, 2-FPsc decrease around next 2-dc cluster and next hdc, 2-FPsc decrease around same hdc and next 2-dc cluster, ch 2, puff stitch in next ch-2 space, ch 2, dc in next dc, ch 3, 2 FPdc around next FPdc, FPdc around each of next 2 FPdc, 2 FPdc around next FPdc, ch 3 ၇ ,dc in next dc, ch 2 ★
Slip st in third ch of first dc.
(8 dc, 16 ch-2 spaces, 8 small puff stitches, 8 2-FPsc decreases, 8 ch-3 spaces, 24 FPdc)
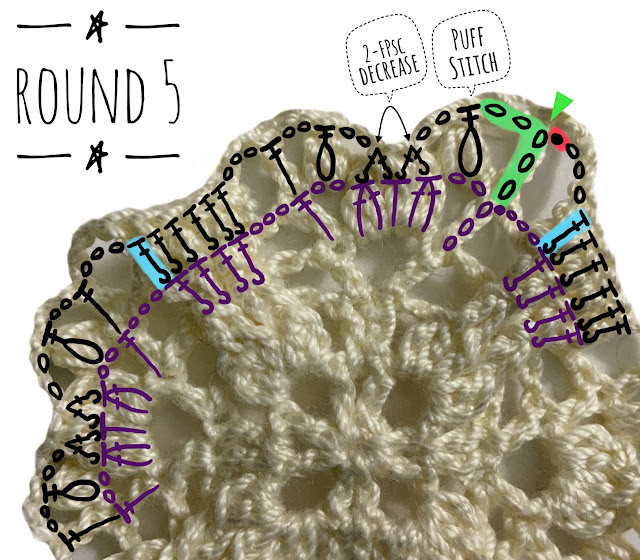
 |
| 1- Yo and insert hook into the ch-2 space indicated. 2- Yo and pull up a loop. (3 loops on hook) 3- Yo and insert hook into the same ch-2 space. Yo and pull up a loop. (5 loops on hook) 4- Repeat Step 3. (7 loops on hook) 5- Yo and pull through 6 loops on hook. (There should be 2 loops left on the hook) 6- Yo and draw through the last 2 loops to complete the puff stitch. |
Repeat from ★ to ★ 3 times and from 🐾 to ၇ once-
★🐾 Ch 3, skip next ch-2 space, large puff stitch in next ch-2 space, ch 1, large puff stitch in next ch-2 space, ch 3, 2 dc in next dc, ch 3, 2-FPdc decrease around next 2 FPdc, FPdc around each of next 2 dc, 2-FPdc decrease around next 2 FPdc, ch 3 ၇, 2 dc in next dc ★
Slip st in third ch of first dc.
(16 dc, 16 ch-3 spaces, 8 large puff stitches, 4 ch-1 spaces, 8 2-FPdc decreases, 8 FPdc)

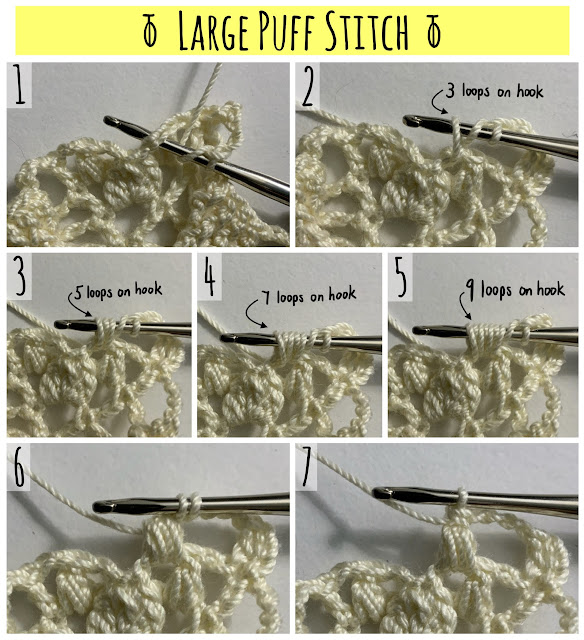 |
| 1- Yo and insert hook into the ch-2 space indicated. 2- Yo and pull up a loop. (3 loops on hook) 3- Yo and insert hook into the same ch-2 space. Yo and pull up a loop. (5 loops on hook) 4- Repeat Step 3. (7 loops on hook) 5- Repeat Step 3. (9 loops on hook) 6- Yo and pull through 8 loops on hook. (There should be 2 loops left on the hook) 7- Yo and draw through the last 2 loops to complete the puff stitch. |
Round 7- Ch 3 (counts as first dc), dc in same dc, 2 dc in next dc,
Repeat from ★ to ★ 3 times and from 🐾 to ၇ once-
★🐾 Ch 3, skip next ch-3 space, sc in next ch-1 space, ch 3, 2 dc in each of next 2 dc, ch 3, sc in next ch-3 space, ch 2, 2-FPsc decrease around next 2 FPdc, ch 15, slip st in second ch from hook, slip st in each of next 13 chs, slip st in last 2-FPsc decrease made (tail made), ch 2, sc in next ch-3 space,
ch 3 ၇, 2 dc in each of next 2 dc ★
Slip st in third ch of first dc.
(32 dc, 16 ch-3 spaces, 12 sc, 8 ch-2 spaces, 4 2-FPsc decreases, 4 tails)
(32 dc, 16 ch-3 spaces, 12 sc, 8 ch-2 spaces, 4 2-FPsc decreases, 4 tails)

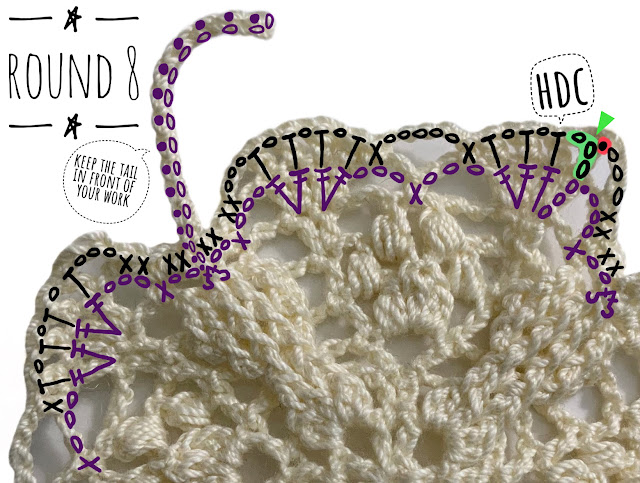
Round 8- Ch 3 (counts as first hdc and ch-1 space), hdc in next dc, [ch 1, hdc in next dc] twice,
Repeat from ★ to ★ 3 times and from 🐾 to ၇ once-★🐾 Sc in next ch-3 space, ch 5, sc in next ch-3 space, hdc in next dc, [ch 1, hdc in next dc] 3 times, ch 3, 2 sc in next ch-3 space, keeping the tail in front of your work- 2 sc in each of next 2 ch-2 spaces, 2 sc in next ch-3 space, ch 3 ၇, hdc in next dc, [ch 1, hdc in next dc] 3 times ★
Slip st in second ch of first hdc.
(32 hdc, 24 ch-1 spaces, 40 sc, 4 ch-5 spaces, 8 ch-3 spaces)
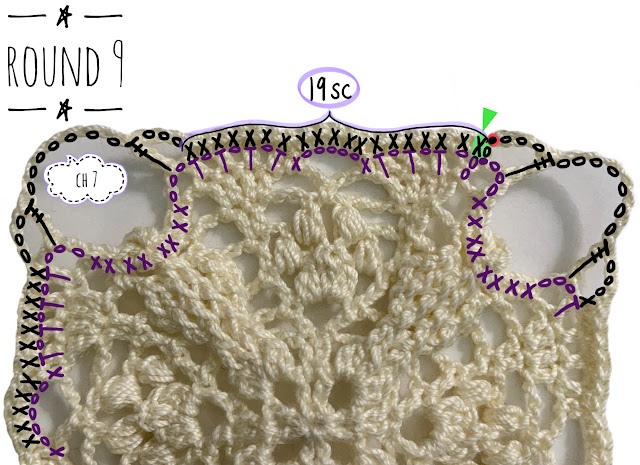
Round 9- Ch 1, sc in same hdc,
Repeat from ★ to ★ 3 times and from 🐾 to ၇ once-
★🐾 [sc in next ch-1 space, sc in next hdc] 3 times, 5 sc in next ch-5 space, sc in next hdc, [sc in next ch-1 space, sc in next hdc] 3 times, ch 3, tr in next ch-3 space, ch 7, tr in next ch-3 space, ch 3 ၇, sc in next hdc ★
Repeat from ★ to ★ 3 times and from 🐾 to ၇ once-
★🐾 [sc in next ch-1 space, sc in next hdc] 3 times, 5 sc in next ch-5 space, sc in next hdc, [sc in next ch-1 space, sc in next hdc] 3 times, ch 3, tr in next ch-3 space, ch 7, tr in next ch-3 space, ch 3 ၇, sc in next hdc ★
Slip st in first sc.
(76 sc, 8 ch-3 spaces, 8 tr, 4 ch-7 spaces)
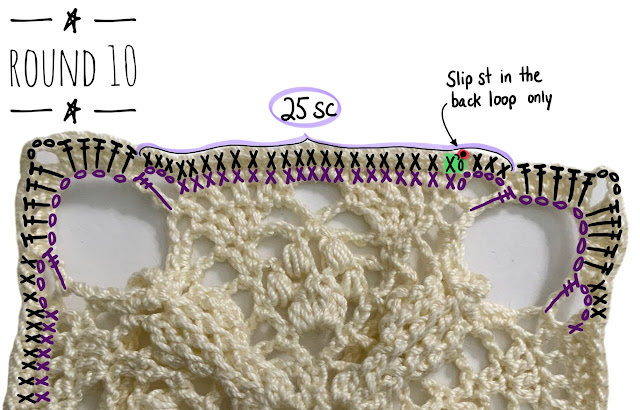
Round 10- Ch 1, sc in same sc, sc in each of next 18 sc,
Repeat from ★ to ★ 3 times and from 🐾 to ၇ once-
★🐾 3 sc in next ch-3 space, in next ch-7 space work- [5 dc, ch 3, 5 dc], 3 sc in next ch-3 space ၇, sc in each of next 19 sc ★
Repeat from ★ to ★ 3 times and from 🐾 to ၇ once-
★🐾 3 sc in next ch-3 space, in next ch-7 space work- [5 dc, ch 3, 5 dc], 3 sc in next ch-3 space ၇, sc in each of next 19 sc ★
Slip st into the back loop only of the first sc.
(100 sc, 40 dc, 4 ch-3 spaces)
Round 11- (On this round all scs are worked in the back loop only) Ch 1, sc in same sc, sc in each of next 21 sc,
Repeat from ★ to ★ 3 times and from 🐾 to ၇ once-
★🐾 Sc in each of next 5 dc, in next 3 chs of next ch-3 space work- sc in first ch, picot, [sc, large picot, ch 1, sc] in second ch, picot, sc in third ch, sc in each of next 5 dc ၇, sc in each of next 25 sc ★
Repeat from ★ to ★ 3 times and from 🐾 to ၇ once-
★🐾 Sc in each of next 5 dc, in next 3 chs of next ch-3 space work- sc in first ch, picot, [sc, large picot, ch 1, sc] in second ch, picot, sc in third ch, sc in each of next 5 dc ၇, sc in each of next 25 sc ★
Sc in each of next 3 sc, slip st in first sc, fasten off and weave in ends.
(156 sc, 8 picots, 4 large picots)

Blocking and Finishing
It is optional but recommended to block your finished piece. Fill a bowl with water and add some liquid starch if you prefer the doily to be lightly stiffened. Soak the doily and gently press out any excess liquid, being careful not to pull or twist on the stitches. Lay it flat on a blocking mat and pin the doily working from the center out to the edges. Allow the doily to dry completely before removing the pins.
It is optional but recommended to block your finished piece. Fill a bowl with water and add some liquid starch if you prefer the doily to be lightly stiffened. Soak the doily and gently press out any excess liquid, being careful not to pull or twist on the stitches. Lay it flat on a blocking mat and pin the doily working from the center out to the edges. Allow the doily to dry completely before removing the pins.
Related Patterns
If you enjoyed this pattern you might also like-


This pattern is by Julia Hart of Draiguna. Feel free to link to this pattern but do not reprint it onto your website. You can sell items made from this pattern. Please credit me as the designer, Julia Hart of Draiguna, link to my etsy shop- draiguna.etsy.com, or to my blog- www.draiguna.com. Please do not claim this pattern as your own, sell, or distribute it. This includes making charts, graphs, or videos. Thank you!
© 2023 Draiguna
This is great! I absolutely love it, can't wait to get started :) Thank you!!
ReplyDeleteit is a very good to be here for it in the middle of it to be here Embroidery Digitizing Service for it to be here to be here into it 7%%$^%%*&687678
ReplyDeleteIt is very adorable to make creative products and that brings joy to everyday life. Therefore, getting the top assistance from MBA essay helpers to fulfill all writing requirements at very cheap rates.
ReplyDeleteThis post is absolutely brimming with creativity. Tails and Toe Beans Square evokes the playful spirit of pets that brighten our daily lives. We all manage the joy and responsibility of parenting in different ways. In between studies like CIPD Assignment Writing our pets bring us comfort, balance, and the simple joy of companionship.
ReplyDelete全体の流れがスムーズで、ストレスなく読める記事でした。geometry dash 無料プレイの操作性や難易度バランスについても分かりやすくまとめられています。
ReplyDelete