


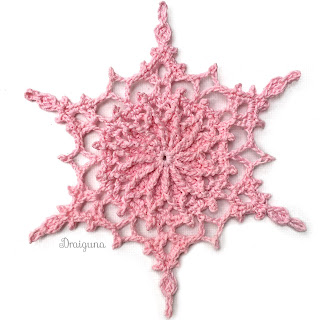
This pattern has 8 rounds and measures about 4”.
A printer friendly version of the pattern is available here- https://www.draiguna.com/p/wispvale-snowflake-printer-friendly.html
Pattern is written using U.S. Terminology.

size 10 thread- 15-20 yards
1.75 mm hook
yarn needle
scissors

Stitch Abbreviations
ch(s)- chains
dc- double crochet
FPdc- front post double crochet
FPsc- front post single crochet


FPsc- front post single crochet
FPtr- front post treble crochet
sc- single crochet
st(s)- stitch(es)
sc- single crochet
st(s)- stitch(es)
yo- yarn over
Special Stitches
FPtr cluster- ❄ yo twice, insert from front to back around dc indicated, yo and pull up a loop, [yo, draw through 2 loops on hook] twice, repeat from ❄ once more, yo and draw through all 3 loops on hook.
FPdc decrease- [yo, insert hook from front to back around next FPdc, yo and pull up a loop, yo and draw through 2 loops on hook] twice, yo, draw through all 3 loops on hook.
picot- ch 3, slip st in last FPsc made.
small picot- ch 2, slip st in second ch from hook.
large picot- ch 5, slip st in last dc made.
picot- ch 3, slip st in last FPsc made.
small picot- ch 2, slip st in second ch from hook.
large picot- ch 5, slip st in last dc made.

[ ] - work enclosed instructions the amount of times indicated, or work enclosed instructions in the stitch or space indicated.
❄ - repeat the following instructions the amount of times indicated.
( ) - Enclose additional information and the number of stitches at the end of a round.

ch 4, sl st in fourth ch to make a ring.
Round 1- ch 3 (counts as first dc now and throughout), 11 dc in ring, slip st to third ch of first dc, mark first dc for stitch placement on Round 3.
(12 dc)
Round 2- ch 3, dc in same st, [2 dc in next dc] around, slip st to third ch of first dc.
(24 dc)
Round 3- ch 3, FPtr cluster around marked dc on Round 1, dc in next dc on Round 2, ch 3, [dc in next dc on Round 2, FPtr cluster around next dc on Round 1, dc in next dc on Round 2, ch 3] around, slip st to third ch of first dc.
(24 dc, 12 FPtr clusters, 12 ch-3 spaces)
Round 4- slip st in next FPtr cluster, ch 1, [FPdc, ch 3, FPdc] around same st, sc in next ch-3 space, ❄ [FPdc, ch 3, FPdc] around next FPtr cluster, sc in next ch-3 space, repeat from ❄ around, slip st to first FPdc.
(12 sc, 24 FPdc, 12 ch-3 spaces)
Round 5- slip st into center ch of next ch-3 space, ch 1, sc in same space, ch 2, FPdc decrease around next 2 FPdc, ch 2, ❄ sc in next ch-3 space, ch 2, FPdc decrease around next 2 FPdc, ch 2, repeat from ❄ around, slip st to first sc.
(12 sc, 24 ch-2 spaces, 12 FPdc decreases)


Round 6- ch 6 (counts as first dc and ch-3 space), dc in same st, sc in next ch-2 space, ch 1, FPsc around next FPdc decrease, picot, ch 1, sc in next ch-2 space, sc in next sc, sc in next ch-2 space, ch 1, FPsc around next FPdc decrease, picot, ch 1, sc in next ch-2 space, ❄ [dc, ch 3, dc] in next sc, sc in next ch-2 space, ch 1, FPsc around next FPdc decrease, picot, ch 1, sc in next ch-2 space, sc in next sc, sc in next ch-2 space, ch 1, FPsc around next FPdc decrease, picot, ch 1, sc in next ch-2 space, repeat from ❄ around, slip st to third ch of first dc.
(12 dc, 6 ch-3 spaces, 30 sc, 24 ch-1 spaces, 12 FPsc, 12 picots)
Round 7- slip st into next ch-3 space, ch 3, [dc, ch 3, 2 dc] in same space, ch 5, skip next 2 sc, sc in next sc, ch 5, ❄ [2 dc, ch 3, 2 dc] in next ch-3 space, ch 5, skip next 2 sc, sc in next sc, ch 5, repeat from ❄ around, slip st to third ch of first dc.
(24 dc, 6 ch-3 spaces, 12 ch-5 spaces, 6 sc)
Round 8- ch 1, sc in same st, small picot, sc in next dc, 2 sc in next ch-3 space, ch 3, slip st in second and third chs from hook, sc in same ch-3 space, ch 2, dc in last sc made, large picot, ch 2, slip st in the last sc made, ch 3, slip st in second and third chs from hook, 2 sc in the same ch-3 space, sc in next dc, small picot, sc in next dc, 5 sc in next ch-5 space, slip st in next sc, 5 sc in next ch-5 space, ❄ sc in next dc, small picot, sc in next dc, 2 sc in next ch-3 space, ch 3, slip st in second and third chs from hook, sc in same ch-3 space, ch 2, dc in last sc made, large picot, ch 2, slip st in the last sc made, ch 3, slip st in second and third chs from hook, 2 sc in the same ch-3 space, sc in next dc, small picot, sc in next dc, 5 sc in next ch-5 space, slip st in next sc, 5 sc in next ch-5 space, repeat from ❄ around, slip st to first sc, fasten off and weave in ends.
(90 sc, 12 small picots, 6 dc, 6 large picots)
(90 sc, 12 small picots, 6 dc, 6 large picots)
Blocking and Finishing
It is optional but recommended to block your finished piece. Fill a bowl with water and add some liquid starch if you prefer the snowflake to be lightly stiffened. Soak and gently press out any excess liquid, being careful not to pull or twist on the stitches. Lay it flat on a blocking mat and pin the snowflake working from the center out to the edges. Allow it to dry completely before removing the pins.


ch 4, sl st in fourth ch to make a ring.

❅ Round 1 ❅
ch 3 (counts as first dc now and throughout), 11 dc in ring, slip st to third ch of first dc, mark first dc for stitch placement on Round 3.
(12 dc)

❅ Round 2 ❅
ch 3, dc in same st, [2 dc in next dc] around, slip st to third ch of first dc.
(24 dc)

❅ Round 3 ❅
ch 3, FPtr cluster around marked dc on Round 1, dc in next dc on Round 2, ch 3, [dc in next dc on Round 2, FPtr cluster around next dc on Round 1, dc in next dc on Round 2, ch 3] around, slip st to third ch of first dc.
(24 dc, 12 FPtr clusters, 12 ch-3 spaces)

FPtr cluster
1- yo twice.
2- insert hook from front to back around the post of the dc indicated on Round 1.
3- yo and pull up a loop (4 loops on hook).
4- [yo and draw through 2 loops on hook] twice (2 loops on hook).
5- repeat steps 1-4 working around the same dc on Round 1 (3 loops on hook).
6- yo and draw through all 3 loops to complete the FPtr cluster.

❅ Round 4 ❅
slip st in next FPtr cluster, ch 1, [FPdc, ch 3, FPdc] around same st, sc in next ch-3 space, ❄ [FPdc, ch 3, FPdc] around next FPtr cluster, sc in next ch-3 space, repeat from ❄ around, slip st to first FPdc.
(12 sc, 24 FPdc, 12 ch-3 spaces)


❅ Round 5 ❅
slip st into center ch of next ch-3 space, ch 1, sc in same space, ch 2, FPdc decrease around next 2 FPdc, ch 2, ❄ sc in next ch-3 space, ch 2, FPdc decrease around next 2 FPdc, ch 2, repeat from ❄ around, slip st to first sc.
(12 sc, 24 ch-2 spaces, 12 FPdc decreases)

❅ Round 6 ❅
ch 6 (counts as first dc and ch-3 space), dc in same st, sc in next ch-2 space, ch 1, FPsc around next FPdc decrease, picot, ch 1, sc in next ch-2 space, sc in next sc, sc in next ch-2 space, ch 1, FPsc around next FPdc decrease, picot, ch 1, sc in next ch-2 space, ❄ [dc, ch 3, dc] in next sc, sc in next ch-2 space, ch 1, FPsc around next FPdc decrease, picot, ch 1, sc in next ch-2 space, sc in next sc, sc in next ch-2 space, ch 1, FPsc around next FPdc decrease, picot, ch 1, sc in next ch-2 space, repeat from ❄ around, slip st to third ch of first dc.
(12 dc, 6 ch-3 spaces, 30 sc, 24 ch-1 spaces, 12 FPsc, 12 picots)

❅ Round 7 ❅
slip st into next ch-3 space, ch 3, [dc, ch 3, 2 dc] in same space, ch 5, skip next 2 sc, sc in next sc, ch 5, ❄ [2 dc, ch 3, 2 dc] in next ch-3 space, ch 5, skip next 2 sc, sc in next sc, ch 5, repeat from ❄ around, slip st to third ch of first dc.
(24 dc, 6 ch-3 spaces, 12 ch-5 spaces, 6 sc)

❅ Round 8 ❅
ch 1, sc in same st, small picot, sc in next dc, 2 sc in next ch-3 space, ch 3, slip st in second and third chs from hook, sc in same ch-3 space, ch 2, dc in last sc made, large picot, ch 2, slip st in the last sc made, ch 3, slip st in second and third chs from hook, 2 sc in the same ch-3 space, sc in next dc, small picot, sc in next dc, 5 sc in next ch-5 space, slip st in next sc, 5 sc in next ch-5 space, ❄ sc in next dc, small picot, sc in next dc, 2 sc in next ch-3 space, ch 3, slip st in second and third chs from hook, sc in same ch-3 space, ch 2, dc in last sc made, large picot, ch 2, slip st in the last sc made, ch 3, slip st in second and third chs from hook, 2 sc in the same ch-3 space, sc in next dc, small picot, sc in next dc, 5 sc in next ch-5 space, slip st in next sc, 5 sc in next ch-5 space, repeat from ❄ around, slip st to first sc, fasten off and weave in ends.
(90 sc, 12 small picots, 6 dc, 6 large picots)

ch 2, dc in last sc made, large picot, ch 2, slip st in the last sc made
1- ch 2.
2- dc in last sc made.
3- ch 5, slip st in last dc made.
4- ch 2, slip st in the last sc made.


This pattern is by Julia Hart of Draiguna. Feel free to link to this pattern but do not reprint it onto your website. You can sell items made from this pattern. Please credit me as the designer, Julia Hart of Draiguna, link to my etsy shop- draiguna.etsy.com, or to my blog- www.draiguna.com. Please do not claim this pattern as your own, sell, or distribute it. Thank you!


It s so pretty, so cute
ReplyDeleteTanks for your mervelous pattern
Gorgeous! Thanks for the beautiful pattern & detailed tutorial!
ReplyDeleteYou and your beautiful creations are wonderful! Thank you so much. I've loved these snowflakes and making them to decorate the Christmas house! Maybe make some spare for sister and mom.
ReplyDeleteTake care! Greetings from Greece!
Je me réjouis de ce blog offrant une compréhension distincte et pratique du sujet. Bague de mariage
ReplyDeleteThank you Julia Hart for this spectacular pattern!! The photo tutorial was a huge help for rows 7 and 8. Row 8 was the hardest stitch pattern I have tried to date, and I nailed it! My first Wispvale Snowflake is stiffened and dry and it's gorgeous! Again, thank you so much!!
ReplyDeleteThank you for this gorgeous pattern, especially for the charts!
ReplyDeleteThis is great. Thank you for the photos - now I know how to do it :) Happy New Year
ReplyDeleteI'm so impressed by the effort that went into the pictures and the stitch symbols drawn over the photo. Very considerate. I am looking forward to making these as Christmas gifts. Being self-quarantined can have some benefits. Thanks!
ReplyDeleteIt is amazingly beautiful. Very well done pattern and the result is amazing.
ReplyDeleteI just made this one, and it was a joy to work on. I love the pictures with the pattern per round, they were super helpful to not get lost. This was probably the most complex pattern I've made so far, but it went together very nicely thanks to the instructions.
ReplyDeleteStitch counts are off on rows 6 and 7 in the written pattern. Thank you for the detailed photos, helped a lot in figuring out stitch placement. Beautiful pattern!
ReplyDeleteIt’s written before, but nonetheless do I want to let you know how I enjoy crocheting these wonderful snowflakes! The patterns are quite complex, but you managed to make them doable by adding the foto’s!
ReplyDeleteMy respect for this work. It’s real beauty!!! 🤩
This comment has been removed by the author.
ReplyDeleteThank you very much for sharing this beautiful pattern. I did three as gifts and the first one took two days to figure out, then the next day I got the other two done much quicker in one day. I hope one day I will be able to pay it forward and create and share a pattern for free.
ReplyDeleteThank you so much for this pattern and the diagrams and photographs. I have been wanting to crochet a lace scarf, and as I looked at your tutorials, I realized that this snowflake and your instructions will be the perfect project for me to learn how to make the stitches I'll need for the lace. Plus the snowflake is absolutely beautiful in its own right.
ReplyDeleteThis is a beautiful pattern that I have made a few times already for gifts. I just finished one for myself - with a very thin thread and a 0.4 mm hook! It’s 5.5 cms / 2.25 inches! I love the clarity of your instructions and the picture tutorial is priceless. Thank you!
ReplyDeleteQué preciosidad! Qué bien explicado. Gracias
ReplyDelete