
__________________________________________________
This post contains affiliate links. If you choose to make a purchase I earn a small commission at no extra cost to you. Thank you for your support!
Eramyst Square
Finished size- 4 1/2"
Pattern is written using U.S. Terminology.

Materials Needed
Size 10 crochet thread in 2 colors
Color 1- 50-75 yards
Color 2- 15-20 yards
1.75 mm hook
Yarn needle
Scissors
Stitch Abbreviations
ch(s)- chain(s)
dc- double crochet
hdc- half double crochet
sc- single crochet
sc-BLO- sc back loop only
slip st- slip stitch
slip st-BLO- slip st back loop only
st(s)- stitch(es)
tr- treble crochet
BPdc- back post double crochet- yo, insert hook from back to front around the post of the st indicated, yo and pull up a loop, [yo and draw through 2 loops on hook] twice.
BPsc- back post single crochet- insert hook from back to front around the post of the st indicated, yo and pull up a loop, yo and draw through 2 loops on hook.
FPdc- front post double crochet- yo, insert hook from front to back around the post of the st indicated, yo and pull up a loop, [yo and draw through 2 loops on hook] twice.
Special Stitches
3-FPdc popcorn- 3 FPdc around the post of the st indicated, drop loop from hook, insert hook into first FPdc made, pick up the dropped loop and draw through.2-FPdc cluster- keeping last loop of each FPdc on hook, FPdc twice around the post of the BPdc indicated, yo and draw through all 3 loops on hook.
2-dc cluster- keeping last loop of each dc on hook, 2 dc in the ch-3 space indicated, yo and draw through all 3 loops on hook.
3-dc cluster- keeping last loop of each dc on hook, 3 dc in the ch-3 space indicated, yo and draw through all 4 loops on hook.
3-tr cluster- keeping last loop of each tr on hook, 3 tr in the ch-3 space indicated, yo and draw through all 4 loops on hook.
5-dc popcorn- 5 dc in the sc indicated, drop loop from hook, insert hook into first dc made, pick up the dropped loop and draw through.
Picot- ch 3, slip st in third ch from hook.
Large picot- ch 5, slip st in fifth ch from hook.
Pattern Notes
[ ] - work enclosed instructions the amount of times indicated, or work enclosed instructions in the stitch or space indicated.
★ - repeat the following instructions the amount of times indicated.
( ) - Enclose additional information and the number of stitches at the end of a round.
For example-2 FPdc around next FPdc, you should make the second FPdc behind the first FPdc.
Symbol Key

Foundation
With Color 1- Ch 4,
Slip st in fourth ch from hook to make a ring.

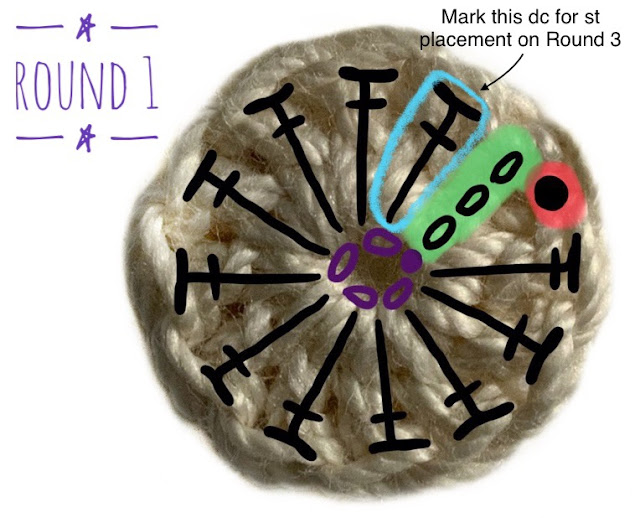
Round 1
Ch 3 (counts as first dc), 11 dc in ring,
Ch 3 (counts as first dc), 11 dc in ring,
Slip st to third ch of first dc.
Mark second dc made for st placement on Round 3.
(12 dc)
Round 2
Ch 1, [FPdc, ch 5, FPdc] around same dc, ch 1, skip next 2 dc, Repeat from ★ to ★ around-
★ [FPdc, ch 5, FPdc] around next dc, ch 1, skip next 2 dc ★
Slip st to first FPdc.
(8 FPdc, 4 ch-5 spaces)

Round 3
Ch 1, FPdc around same FPdc, 7 dc in next ch-5 space, FPdc around next FPdc, ch 2, slip st in between marked dc and next dc on Round 1, ch 2, Repeat from ★ to ★ around-
★ FPdc around next FPdc on Round 2, 7 dc in next ch-5 space, FPdc around next FPdc, ch 2, skip next 2 dc on Round 1, slip st in between next 2 dc on Round 1 directly below, ch 2 ★
Slip st to first FPdc.
(8 FPdc, 28 dc, 8 ch-2 spaces, 4 slip sts)

Round 4
Ch 1, 2 FPdc around same FPdc, skip next dc, BPsc around each of next 2 dc, [BPsc, ch 2, BPsc] around next dc, BPsc around each of next 2 dc, 2 FPdc around next FPdc,
Repeat from ★ to ★ around-
★ ch 3, 2 FPdc around next FPdc, skip next dc, BPsc around each of next 2 dc, [BPsc, ch 2, BPsc] around next dc, BPsc around each of next 2 dc, 2 FPdc around next FPdc ★
Ch 1, hdc in first FPdc to make last ch-3 space.
Note- If a section is underlined it is optional to work the second FPdc behind the previous FPdc stitch made. This is to give it a symmetrical look.
(16 FPdc, 24 BPsc, 4 ch-2 spaces, 4 ch-3 spaces)

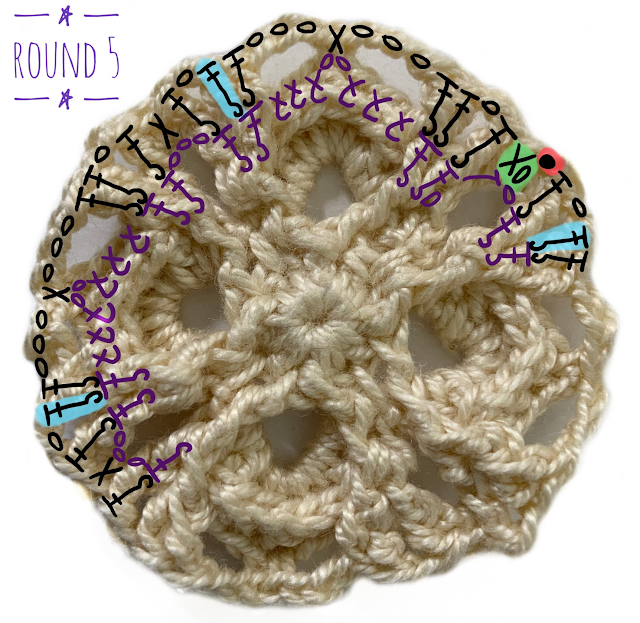
Round 5
Ch 1, sc in same ch-3 space, Repeat from ★ to ★ 3 times and from ◆ to ❖ once-
★ ◆ FPdc around next FPdc, ch 1, 2 FPdc around next FPdc, ch 3, sc in next ch-2 space, ch 3, 2 FPdc around next FPdc, ch 1, FPdc around next FPdc ❖, sc in next ch-3 space ★
Slip st to first sc.
(24 FPdc, 8 ch-1 spaces, 8 ch-3 spaces, 8 sc)
Round 6
Slip st in next FPdc, ch 1, 3-FPdc popcorn around same FPdc, Repeat from ★ to ★ 3 times and from ◆ to ❖ once-
★ ◆ ch 2, FPdc around next FPdc, ch 1, 2 FPdc around next FPdc, sc in next ch-3 space, ch 3, sc in next ch-3 space, 2 FPdc around next FPdc, ch 1, FPdc around next FPdc, ch 2, 3-FPdc popcorn around next FPdc ❖, ch 1, 3-FPdc popcorn around next FPdc ★
Sc in first 3-FPdc popcorn to make last ch-1 space.
(8 3-FPdc popcorns, 8 ch-2 spaces, 24 FPdc, 12 ch-1 spaces, 8 sc, 4 ch-3 spaces)

Round 7
Ch 1, sc in same ch-1 space, Repeat from ★ to ★ 3 times and from ◆ to ❖ once-
★ ◆ ch 3, 3-FPdc popcorn around next FPdc, ch 2, FPdc around next FPdc, ch 1, 2 FPdc around next FPdc, sc in next ch-3 space, 2 FPdc around next FPdc, ch 1, FPdc around next FPdc, ch 2, 3-FPdc popcorn around next FPdc ❖, ch 3, sc in next ch-1 space
Ch 1, hdc in first sc to make last ch-3 space.8 sc
(8 ch-3 spaces, 8 3-FPdc popcorns, 8 ch-2 spaces, 24 FPdc, 8 ch-1 spaces)

Round 8
Ch 1, sc in same ch-3 space, Repeat from ★ to ★ 3 times and from ◆ to ❖ once-
★ ◆ ch 5, sc in next ch-3 space, ch 3, 3-FPdc popcorn around next FPdc, ch 2, 2 FPdc around next FPdc, ch 1, [FPdc around next FPdc, ch 1] twice, 2 FPdc around next FPdc, ch 2, 3-FPdc popcorn around next FPdc ❖, ch 3, sc in next ch-3 space ★
Ch 1, hdc in first sc to make last ch-3 space.8 sc
(4 ch-5 spaces, 8 ch-3 spaces, 8 3-FPdc popcorns, 8 ch-2 spaces, 24 FPdc, 12 ch-1 spaces)

Round 9
Ch 1, sc in same ch-3 space, Repeat from ★ to ★ 3 times and from ◆ to ❖ once-
★ ◆ 8 dc in next ch-5 space, sc in next ch-3 space, ch 3, 2 FPdc around next FPdc, ch 1, FPdc around next FPdc, ch 2, 3-FPdc popcorn around next FPdc, ch 1, 3-FPdc popcorn around next FPdc, ch 2, FPdc around next FPdc, ch 1, 2 FPdc around next FPdc ❖, ch 3, sc in next ch-3 space ★
Ch 1, hdc in first sc to make last ch-3 space.
(8 sc, 32 dc, 8 ch-3 spaces, 24 FPdc, 12 ch-1 spaces, 8 ch-2 spaces, 8 3-FPdc popcorns)

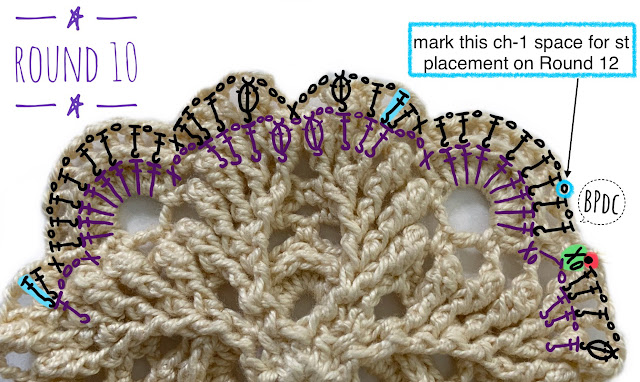
Round 10
Ch 1, sc in same ch-3 space, Repeat from ★ to ★ 3 times and from ◆ to ❖ once-
★ ◆ BPdc around next dc, [ch 1, BPdc around next dc] 7 times, sc in next ch-3 space, 2 FPdc around next FPdc, ch 1, FPdc around next FPdc, ch 2, 3-FPdc popcorn around next FPdc, ch 3, sc in next ch-1 space, ch 3, 3-FPdc popcorn around next FPdc, ch 2, FPdc around next FPdc, ch 1, 2 FPdc around next FPdc ❖, sc in next ch-3 space ★
Slip st to first sc.
Mark second ch-1 space made for st placement on Round 12.
(8 sc, 32 BPdc, 36 ch-1 spaces, 24 FPdc, 8 ch-2 spaces, 8 3-FPdc popcorns, 8 ch-3 spaces)
Round 11
Slip st in next BPdc, slip st into next ch-1 space and slip st in next BPdc, ch 1, 2-FPdc cluster around same BPdc, Repeat from ★ to ★ 3 times and from ◆ to ❖ once-
★ ◆ [ch 1, 2-FPdc cluster around next BPdc] 5 times, FPdc around next FPdc, ch 1, 2 FPdc around next FPdc, ch 2, 3-FPdc popcorn around next FPdc, ch 3, 2 sc in next ch-3 space, sc in next sc, 2 sc in next ch-3 space, ch 3, 3-FPdc popcorn around next FPdc, ch 2, 2 FPdc around next FPdc, ch 1, FPdc around next FPdc ❖, skip next BPdc, 2-FPdc cluster around next BPdc ★
Slip st to first 2-FPdc cluster.24 2-FPdc clusters
(28 ch-1 spaces, 24 FPdc, 8 ch-2 spaces, 8 3-FPdc popcorns, 8 ch-3 spaces, 20 sc)

Round 12
Ch 1, working behind the 2-FPdc clusters on Round 11- slip st in the marked ch-1 space on Round 10, ch 3 (counts as first dc), dc in same ch-1 space, 2 dc in each of next 4 ch-1 spaces on Round 10, Repeat from ★ to ★ 3 times and from ◆ to ❖ once-
★ ◆ 3-FPdc popcorn around next FPdc on Round 11, ch 2, FPdc around next FPdc, ch 1, 2 FPdc around next FPdc, ch 3, 2 sc in next ch-3 space, sc in each of next 5 sc, 2 sc in next ch-3 space, ch 3,
2 FPdc around next FPdc, ch 1, FPdc around next FPdc, ch 2, 3-FPdc popcorn around next FPdc ❖, skip next ch-1 space on Round 10, working behind the 2-FPdc clusters on Round 11- 2 dc in each of next 5 ch-1 spaces on Round 10 ★
Slip st to first dc.
Mark 5th sc made for st placement on Round 15.
(40 dc, 8 3-FPdc popcorns, 8 ch-2 spaces, 24 FPdc, 8 ch-1 spaces, 8 ch-3 spaces, 36 sc)
Slip st to first dc.
Mark 5th sc made for st placement on Round 15.
(40 dc, 8 3-FPdc popcorns, 8 ch-2 spaces, 24 FPdc, 8 ch-1 spaces, 8 ch-3 spaces, 36 sc)

Round 13
Slip st in each of next 2 dc, ch 1, BPsc around same dc, BPsc around each of next 5 dc, Repeat from ★ to ★ 3 times and from ◆ to ❖ once-
★ ◆ ch 3, 3-FPdc popcorn around next FPdc, ch 2, FPdc around next FPdc, ch 1, 2 FPdc around next FPdc, ch 3, 2 sc in next ch-3 space, sc in each of next 4 sc, ch 1, skip next sc, sc in each of next 4 sc, 2 sc in next ch-3 space, ch 3, 2 FPdc around next FPdc, ch 1, FPdc around next FPdc, ch 2, 3-FPdc popcorn around next FPdc, ch 3 ❖, skip next 2 dc, BPsc around each of next 6 dc ★
Slip st to first BPsc.
(24 BPsc, 16 ch-3 spaces, 8 3-FPdc popcorns, 8 ch-2 spaces, 24 FPdc, 12 ch-1 spaces, 48 sc)

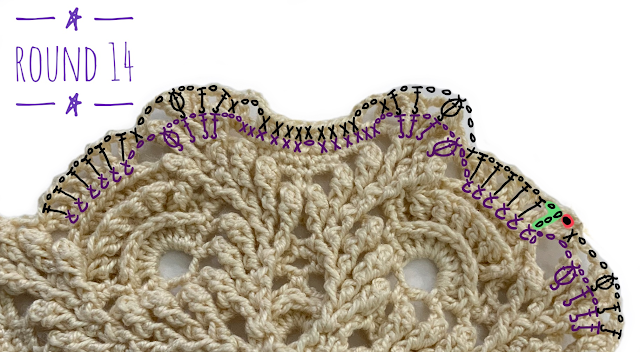
Round 14
Ch 4 (counts as first dc and ch-1 space), dc in next BPsc, [ch 1, dc in next BPsc] 4 times, Repeat from ★ to ★ 3 times and from ◆ to ❖ once-
★ ◆ sc in next ch-3 space, ch 3, 3-FPdc popcorn around next FPdc, ch 2, FPdc around next FPdc, ch 1, FPdc around next FPdc, sc in next ch-3 space, ch 3, skip next 2 sc, sc in each of next 4 sc, sc in next ch-1 space, sc in each of next 4 sc, ch 3, sc in next ch-3 space, FPdc around next FPdc, ch 1, FPdc around next FPdc, ch 2, 3-FPdc popcorn around next FPdc, ch 3, sc in next ch-3 space ❖, dc in next BPsc, [ch 1, dc in next BPsc] 5 times ★
Slip st to third ch of first dc.
(24 dc, 28 ch-1 spaces, 16 ch-3 spaces, 8 3-FPdc popcorns, 8 ch-2 spaces, 16 FPdc, 36 sc)
Round 15
Slip st into next ch-1 space, ch 2, 2-dc cluster in same space (counts as first 3-dc cluster), ch 3, 3-dc cluster in next ch-1 space, ch 3, [3-tr cluster, ch 3, 3-tr cluster] in next ch-1 space, [ch 3, 3-dc cluster in next ch-1 space] twice, sc in next ch-3 space, ch 3, 3-FPdc popcorn around next FPdc, ch 2, FPdc around next FPdc, sc in next ch-3 space, ch 3, skip next 2 sc, sc in each of next 2 sc, ch 1, 5-dc popcorn in marked sc on Round 12,Repeat from ★ to ★ 3 times and from ◆ to ❖ once-
★ ◆ ch 1, skip next sc on Round 14, sc in each of next 2 sc on Round 14, ch 3, sc in next ch-3 space, FPdc around next FPdc, ch 2, 3-FPdc popcorn around next FPdc, ch 3, sc in next ch-3 space ❖, [3-dc cluster in next ch-1 space, ch 3] twice, [3-tr cluster, ch 3, 3-tr cluster] in next ch-1 space, [ch 3, 3-dc cluster in next ch-1 space] twice, sc in next ch-3 space, ch 3, 3-FPdc popcorn around next FPdc, ch 2, FPdc around next FPdc, sc in next ch-3 space, ch 3, skip next 2 sc, sc in each of next 2 sc, ch 1, 5-dc popcorn in next skipped sc on Round 12 directly below ★
Slip st to first 3-dc cluster.
(16 3-dc clusters, 36 ch-3 spaces, 8 3-tr clusters, 8 3-FPdc popcorns, 8 ch-2 spaces, 8 FPdc, 16 sc, 8 ch-1 spaces, 4 5-dc popcorns)

Round 16
Slip st into next ch-3 space, ch 3 (counts as first dc), 2 dc in same space, 3 dc in next ch-3 space, Repeat from ★ to ★ 3 times and from ◆ to ❖ once-
★ ◆ [3 dc, ch 3, 3 dc] in next ch-3 space, 3 dc in each of next 2 ch-3 spaces, ch 3, sc in next ch-3 space, ch 3, 3-FPdc popcorn around next FPdc, 3 sc in next ch-3 space, sc in next sc, ch 3, skip next 2 sc, sc in next sc, 3 sc in next ch-3 space, 3-FPdc popcorn around next FPdc, ch 3, skip next ch-2 space, sc in next ch-3 space, ch 3 ❖, 3 dc in each of next 2 ch-3 spaces ★
Slip st to the back loop only of third ch of first dc, fasten off Color 1.
(72 dc, 24 ch-3 spaces, 40 sc)

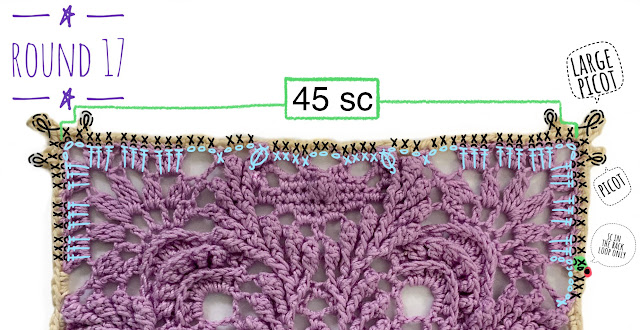
Round 17
With Color 2- Ch 1, sc-BLO (back loop only) in same dc, sc-BLO in each of next 8 dc, ch 3, slip st in third ch from hook (picot made), Repeat from ★ to ★ 3 times and from ◆ to ❖ once-
★ ◆ working in the chs of next corner ch-3 space- sc-BLO in first ch, [sc-BLO, ch 5, slip st in fifth ch from hook (large picot made), sc-BLO] in second ch, sc in third ch, picot, sc-BLO in each of next 9 dc, 3 sc in each of next 2 ch-3 spaces, sc in each of next 4 sc, 3 sc in next ch-3 space, sc in each of next 4 sc, sc in each of next 2 ch-3 spaces ❖, sc-BLO in each of next 9 dc ★
Slip st to first sc, fasten off and weave in ends.
(88 sc-BLO, 180 sc, 8 picots, 4 large picots)
It is optional but recommended to block your finished piece. Fill a bowl with water and add some liquid starch if you prefer the doily to be lightly stiffened. Soak the doily and gently press out any excess liquid, being careful not to pull or twist on the stitches. Lay it flat on a blocking mat and pin the doily working from the center out to the edges. Allow the doily to dry completely before removing the pins.


Related Patterns
If you enjoyed this pattern you might also like-


This pattern is by Julia Hart of Draiguna. Feel free to link to this pattern but do not reprint it onto your website. You can sell items made from this pattern. Please credit me as the designer, Julia Hart of Draiguna, link to my etsy shop- draiguna.etsy.com, or to my blog- www.draiguna.com. Please do not claim this pattern as your own, sell, or distribute it. This includes making charts, graphs, or videos. Thank you!
© 2022 Draiguna
wonderful!!!
ReplyDeleteOooo! I feel like this is meant to be. I was digging through my stash for all the purple yarn I could find and grouped it together. Time to make a lot of these squares into a blanket? :D Thank you so much!
ReplyDeleteThe mysterious and captivating ambiance of Eramyst Square keeps readers interested. The quality and inventiveness of a horror book publishing service business are properly reflected in its dark creative style.
DeleteEramyst Square is a lively, interesting area that showcases culture and innovation. In a similar vein, Book and eBook Editing Service guarantees that information is polished, error-free, and expertly honed, improving readability and providing readers with a powerful, memorable experience.
DeleteCongratulations - your work is stunningly beautiful and I am so delighted to have found you and your work. You ae so VERY talented. Keep up the passion and I am going to follow you now.
ReplyDeleteThank u so much for that masterpiece! Love it so!❤️❤️
ReplyDeleteSo lovely, i can see this as a blanket of colorful squares!
ReplyDeleteAnother beauty from the hands of the master!!!
ReplyDeleteYour designs are so incredibly elaborate! I think perhaps these equally elaborate diagrams might make this possible for me... I'm going to give it a go.
ReplyDeleteNice post thank you Elaine
ReplyDeleteSorry SMS
ReplyDeleteShubh Kamnaye
Puzzle SMS
Political SMS
Jeeto Preeto
judaai Shayari
Doctor SMS
Jannat Shayari
Love your patterns so much! What is the circular pattern in the background of the image under the "blocking and finishing" section?
ReplyDelete