
Happy Granny Square Day! Today I'm sharing the pattern for the Sylvanweave Square.
For the squares pictured I used Aunt Lydia's size 10 crochet thread in the colors Olive and Ecru.
An ad-free printable version of this pattern is also available here-
Sylvanweave Square

Finished size- 5" - 6 ½”
Pattern is written using U.S. Terminology
Materials Needed
Size 10 crochet thread- 75-100 yards
a second color for the border (optional)
1.75 mm hook
yarn needle
scissors
Stitch Abbreviations
BPsc- back post single crochet
ch(s)- chains
dc- double crochet
FPdc- front post double crochet
FPsc- front post single crochet
hdc- half double crochet
sc- single crochet
sc-BLO- single crochet back loop only
st(s)- stitch(es)
tr- treble crochet
yo- yarn over
Pattern Notes
[ ] , { } - work enclosed instructions the amount of times indicated, or work enclosed instructions in or around the stitch or space indicated.
★ - repeat from ★ to ★ the amount of times indicated.
☾ and ☽ - repeat from ☾ to ☽ the amount of times indicated.
( ) - Enclose additional information and the amount of stitches at the end of each round.
Optional- If section is underlined it is optional to work the underlined FPdc behind the previous FP stitch made.
For example-
2 FPdc around next FPdc, you should make the second FPdc behind the first FPdc.
Text highlighted in this color means that there are photos and additional information below.
Special Stitches
Picot- ch 3, slip st in third ch from hook.
2-FPdc decrease- keeping last loop of each FPdc on hook, FPdc around each of the next 2 sts indicated, yo and draw through all 3 loops on hook.
4-dc popcorn- 4 dc in ch-1 space indicated, drop loop from hook, insert hook into the first dc made, pick up the dropped loop and pull through.
3-dc cluster- keeping last loop of each dc on hook, 3 dc in the ch-3 space indicated, yo and draw through all 4 loops on hook.
2-FPdc cluster- keeping last loop of each FPdc on hook, make 2 FPdc around the dc indicated, yo and draw through all 3 loops on hook.
Large picot- ch 5, slip st in fifth ch from hook.
Small picot- ch 2, slip st in second ch from hook.
Symbol Key

Instructions
Foundation
Ch 4, slip st in fourth ch from hook to make a ring.

Round 1
ch 3 (counts as first dc), 15 dc in ring, Slip st to third ch of first dc.
(16 dc)
 Round 2
Ch 6, (counts as first dc and ch-3 space), dc in same st, skip next dc, 3 dc in next dc, skip next dc,
Repeat from ★ to ★ around-
★ [dc, ch 3, dc] in next dc, skip next dc, 3 dc in next dc, skip next dc ★
Slip st to third ch of first dc.
(20 dc, 4 ch-3 spaces)
Repeat from ★ to ★ around-
★ [dc, ch 3, dc] in next dc, skip next dc, 3 dc in next dc, skip next dc ★
Slip st to third ch of first dc.
(20 dc, 4 ch-3 spaces)
 Round 3
Slip st into next ch-3 space, ch 3, 4 dc in same space, ch 3, skip next 2 dc, sc in next dc, ch 3,
Repeat from ★ to ★ around-
★ 5 dc in next ch-3 space, skip next 2 dc, sc in next dc, ch 3 ★
Slip st to third ch of first dc
(20 dc, 8 ch-3 spaces, 4 sc)
★ 5 dc in next ch-3 space, skip next 2 dc, sc in next dc, ch 3 ★
Slip st to third ch of first dc
(20 dc, 8 ch-3 spaces, 4 sc)

Round 4
Ch 1, sc in same st, skip next dc, using next dc work- [FPdc, ch 2, sc, ch 2, FPdc], skip next dc, sc in next dc, ch 3, sc in next ch-3 space, ch 3, slip st in third ch from hook (picot made), ch 1, sc in next ch-3 space, Repeat from ★ to ★ around-
★ Ch 3, sc in next dc, skip next dc, using next dc work- [FPdc, ch 2, sc, ch 2, FPdc], skip next dc, sc in next dc, ch 3, sc in next ch-3 space, picot, ch 1, sc in next ch-3 space ★
Ch 2, sc in first sc to make last ch-3 space.
(20 sc, 8 FPdc, 8 ch-2 spaces, 8 ch-3 spaces, 4 picots)
★ Ch 3, sc in next dc, skip next dc, using next dc work- [FPdc, ch 2, sc, ch 2, FPdc], skip next dc, sc in next dc, ch 3, sc in next ch-3 space, picot, ch 1, sc in next ch-3 space ★
Ch 2, sc in first sc to make last ch-3 space.
(20 sc, 8 FPdc, 8 ch-2 spaces, 8 ch-3 spaces, 4 picots)

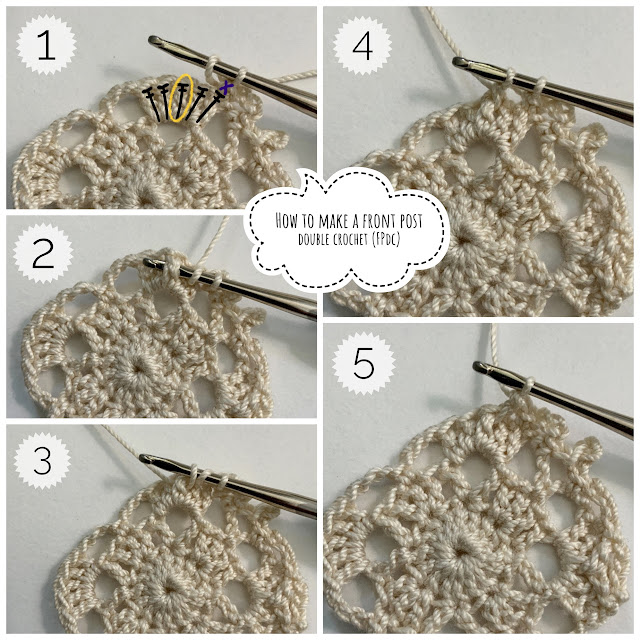
How to make a front post double crochet (FPdc)
1- yo, you will be working around the post of the dc circled in the first picture.
2- insert hook from front to back around the post of the dc indicated.
3- yo and pull up a loop.
4- yo and draw through 2 loops on hook. (2 loops remaining on the hook)
5- yo and draw through the last 2 loops on the hook to complete the FPdc.
Using next dc work- [FPdc, ch 2, sc, ch 2, FPdc]
1- You will be working around the post of and in the center dc of the 5-dc group, indicated in the first picture. FPdc around the post of this dc and ch 2, sc in the same dc.
2- ch 2 and FPdc around the post of the same dc.

Round 5
Ch 1, sc in same ch-3 space, 2 FPdc around next FPdc, ch 7, 2 FPdc around next FPdc (optional- work second FPdc behind the last FPdc made), sc in next ch-3 space, Repeat from ★ to ★ around-
★ Ch 7, sc in next ch-3 space, 2 FPdc around next FPdc, ch 7, 2 FPdc around next FPdc (optional- work second FPdc behind the previous FPdc made), sc in next ch-3 space ★
Ch 3, tr in first sc to make last ch-7 space.
★ Ch 7, sc in next ch-3 space, 2 FPdc around next FPdc, ch 7, 2 FPdc around next FPdc (optional- work second FPdc behind the previous FPdc made), sc in next ch-3 space ★
Ch 3, tr in first sc to make last ch-7 space.
Optional- If a section is underlined it is optional to work the underlined FPdc behind the last FP st made. This is to give it a symmetrical look.
(8 sc, 16 FPdc, 8 ch-7 spaces)
(8 sc, 16 FPdc, 8 ch-7 spaces)
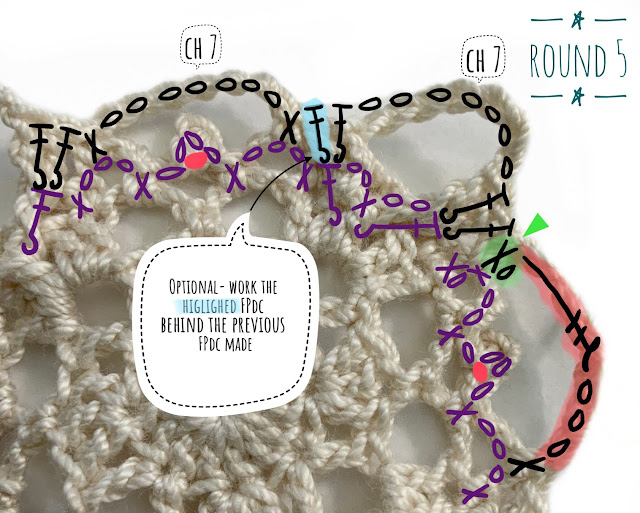
Optional- work the second FPdc behind the last FPdc made
1- yo and slide the last FPdc made forward to make it easier to insert hook behind it.2- Insert hook from front to back around the post of the same dc working behind the last FPdc made.
3- yo and pull up a loop, [yo and draw through 2 loops on hook] twice to complete the FPdc.
Ch 1, 3 sc in same ch-7 space, 2 FPdc around next FPdc, ch 1, FPdc around next FPdc, ch 2, in next ch-7 space work- [sc, ch 2] 3 times, FPdc around next FPdc, ch 1, 2 FPdc around next FPdc,Round 6
Repeat from ★ to ★ around-
★ [3 sc, ch 3, 3 sc] in next ch-7 space, 2 FPdc around next FPdc, ch 1, FPdc around next FPdc, ch 2, in next ch-7 space work- [sc, ch 2] 3 times, FPdc around next FPdc, ch 1, 2 FPdc around next FPdc ★
3 sc in same ch-7 space as first sc, ch 1, hdc in first sc to make last ch-3 space.
★ [3 sc, ch 3, 3 sc] in next ch-7 space, 2 FPdc around next FPdc, ch 1, FPdc around next FPdc, ch 2, in next ch-7 space work- [sc, ch 2] 3 times, FPdc around next FPdc, ch 1, 2 FPdc around next FPdc ★
3 sc in same ch-7 space as first sc, ch 1, hdc in first sc to make last ch-3 space.
Mark 5th sc made for st placement on Round 8.
(36 sc, 24 FPdc, 8 ch-1 spaces, 16 ch-2 spaces, 4 ch-3 spaces)

Round 7
Repeat from ★ to ★ around-
★ [dc, ch 3] twice in next ch-3 space, 2-FPdc decrease around next 2 FPdc, ch 2, 2 FPdc around next FPdc, sc in next ch-2 space, [ch 2, sc in next ch-2 space] 3 times, 2 FPdc around next FPdc, ch 2, 2-FPdc decrease around next 2 FPdc, ch 3 ★
Slip st to third ch of first dc.
(8 dc, 12 ch-3 spaces, 8 2-FPdc decreases, 20 ch-2 spaces, 16 FPdc, 16 sc)

Round 8
Ch 4 (counts as first dc and ch-1 space), 3 dc in center ch of next ch-3 space, ch 1, dc in next dc, ch 3, FPsc around next 2-FPdc decrease, ch 2, 2 FPdc around next FPdc, ch 1, FPdc around next FPdc, sc in next ch-2 space, [dc, ch 1,dc] in the marked sc on Round 6, skip next ch-2 space on Round 7,
Repeat from ★ to ★ 3 times and from ☾ to ☽ once-
★ ☾ sc in next ch-2 space, FPdc around next FPdc, ch 1, 2 FPdc around next FPdc, ch 2, FPsc around next 2-FPdc decrease, ch 3 ☽,
Repeat from ★ to ★ 3 times and from ☾ to ☽ once-
★ ☾ sc in next ch-2 space, FPdc around next FPdc, ch 1, 2 FPdc around next FPdc, ch 2, FPsc around next 2-FPdc decrease, ch 3 ☽,
dc in next dc, ch 1, 3 dc in center ch of next ch-3 space, ch 1, dc in next dc, ch 3, FPsc around next
2-FPdc decrease, ch 2, 2 FPdc around next FPdc, ch 1, FPdc around next FPdc, sc in next ch-2 space,
[dc, ch 1, dc] in the center sc in the ch-7 space on Round 6 directly below, skip next ch-2 space on Round 7 ★
Slip st to third ch of first dc.
(24 dc, 20 ch-1 spaces, 8 ch-3 spaces, 8 FPsc, 28 FPdc, 8 ch-2 spaces, 8 sc)

How to make a front post single crochet (FPsc)

[dc, ch 1,dc] in the marked sc on Round 6

Round 9
Ch 4 (counts as first dc and ch-1 space), Repeat from ★ to ★ 3 times and from ☾ to ☽ once-
★ ☾ 2 FPdc around next dc, ch 1, FPdc around next dc, ch 1, 2 FPdc around next dc, ch 1, dc in next dc, ch 3, 2-FPdc decrease around next 2 FPdc, ch 2, 2 FPdc around next FPdc, ch 1, FPdc around next dc, ch 1, 4-dc popcorn in next ch-1 space, ch 1, FPdc around next dc, ch 1, 2 FPdc around next FPdc, ch 2, 2-FPdc decrease around next 2 FPdc, ch 3 ☽, dc in next dc, ch 1 ★
Slip st to third ch of first dc.
(8 dc, 32 ch-1 spaces, 44 FPdc, 8 ch-3 spaces, 8 2-FPdc decreases, 8 ch-2 spaces, 4 4-dc popcorns)

How to make a 4-dc popcorn
1- Make 4 dc in the next ch-1 space indicated.2- Drop the loop from the hook and insert the hook into the first dc made.
3- Pick up the dropped loop.
4- Pull the loop through to complete the 4-dc popcorn.
Repeat from ★ to ★ 3 times and from ☾ to ☽ once-
★ ☾ ch 1, 2-FPdc decrease around next 2 FPdc, ch 2, [FPdc, ch 1, FPdc] around next FPdc, ch 2,
Round 10
Ch 3 (counts as first dc), dc in same st, Repeat from ★ to ★ 3 times and from ☾ to ☽ once-
★ ☾ ch 1, 2-FPdc decrease around next 2 FPdc, ch 2, [FPdc, ch 1, FPdc] around next FPdc, ch 2,
2-FPdc decrease around next 2 FPdc, ch 1, 2 dc in next dc, ch 3, FPsc around next 2-FPdc decrease,
ch 2, 2 FPdc around next FPdc, ch 1, FPdc around next FPdc, ch 1, 2-FPdc decrease around next
2 FPdc, ch 1, FPdc around next FPdc, ch 1, 2 FPdc around next FPdc, ch 2, FPsc around next
2-FPdc decrease, ch 3 ☽, 2 dc in next dc ★
Slip st to third ch of first dc.
(16 dc, 28 ch-1 spaces, 12 2-FPdc decreases, 16 ch-2 spaces, 32 FPdc, 8 ch-3 spaces, 8 FPsc)
Slip st to third ch of first dc.
(16 dc, 28 ch-1 spaces, 12 2-FPdc decreases, 16 ch-2 spaces, 32 FPdc, 8 ch-3 spaces, 8 FPsc)

Round 11
Ch 3 (counts as first dc), dc in same st, 2 dc in next dc,Repeat from ★ to ★ 3 times and from ☾ to ☽ once-
★ ☾ ch 1, FPsc around next 2-FPdc decrease, ch 3, 2 FPdc around next FPdc, ch 1, dc in next
★ ☾ ch 1, FPsc around next 2-FPdc decrease, ch 3, 2 FPdc around next FPdc, ch 1, dc in next
ch-1 space, ch 1, 2 FPdc around next FPdc, ch 3, FPsc around next 2-FPdc decrease, ch 1, 2 dc in each of next 2 dc, ch 3, 2 FPdc decrease around next 2 FPdc, ch 2, 2 FPdc around next FPdc, ch 1,
FPsc around next 2-FPdc decrease, ch 1, 2 FPdc around next FPdc, ch 2, 2-FPdc decrease around
next 2 FPdc, ch 3 ☽, 2 dc in each of next 2 dc ★
Slip st to third ch of first dc.
(36 dc, 24 ch-1 spaces, 12 FPsc, 16 ch-3 spaces, 32 FPdc, 8 2-FPdc decreases, 8 ch-2 spaces)
Slip st to third ch of first dc.
(36 dc, 24 ch-1 spaces, 12 FPsc, 16 ch-3 spaces, 32 FPdc, 8 2-FPdc decreases, 8 ch-2 spaces)

Round 12
Ch 4 (counts as first dc and ch-1 space), dc in next dc, [ch 1, dc in next dc] twice, Repeat from ★ to ★ 3 times and from ☾ to ☽ once-
★ ☾ ch 3, skip next ch-1 space, sc in next ch-3 space, ch 1, 2-FPdc decrease around next 2 FPdc, ch 2, 3 dc in next dc, ch 2, 2-FPdc decrease around next 2 FPdc, ch 1, sc in next ch-3 space, ch 3, dc in next dc, [ch 1, dc in next dc] 3 times, ch 3, FPsc around next 2-FPdc decrease, ch 2, [2-FPdc decrease around next 2 FPdc, ch 2] twice, FPsc around next 2-FPdc decrease, ch 3 ☽,
★ ☾ ch 3, skip next ch-1 space, sc in next ch-3 space, ch 1, 2-FPdc decrease around next 2 FPdc, ch 2, 3 dc in next dc, ch 2, 2-FPdc decrease around next 2 FPdc, ch 1, sc in next ch-3 space, ch 3, dc in next dc, [ch 1, dc in next dc] 3 times, ch 3, FPsc around next 2-FPdc decrease, ch 2, [2-FPdc decrease around next 2 FPdc, ch 2] twice, FPsc around next 2-FPdc decrease, ch 3 ☽,
dc in next dc, [ch 1, dc in next dc] 3 times ★
Slip st to third ch of first dc.
(44 dc, 32 ch-1 spaces, 16 ch-3 spaces, 8 sc, 16 2-FPdc decreases, 20 ch-2 spaces, 8 FPsc)

Round 13
Slip st into next ch-1 space, ch 2, 2-dc cluster in same space (counts as first 3-dc cluster), ch 3, [3-dc cluster in next ch-1 space, ch 3] twice, Repeat from ★ to ★ 3 times and from ☾ to ☽ once-
★ ☾ sc in next ch-3 space, ch 1, FPsc around next 2-FPdc decrease,ch 3, dc in next dc, 3 dc in next dc, dc in next dc, ch 3, FPsc around next 2-FPdc decrease, ch 1, skip next ch-1-space, sc in next
ch-3 space, ch 3, [3-dc cluster in next ch-1 space, ch 3] 3 times, [FPsc around next 2-FPdc decrease, ch 3] twice, skip next ch-2 space and next ch-3 space ☽, [3-dc cluster in next ch-1 space, ch 3] 3 times ★
Slip st to first 3-dc cluster.
Slip st to first 3-dc cluster.
Mark fourth ch-3 space for st placement on Round 15.
(24 3-dc clusters, 44 ch-3 spaces, 8 sc, 8 ch-1 spaces, 16 FPsc, 20 dc)

Round 14
Ch 3 (counts as first dc), Repeat from ★ to ★ 3 times and from ☾ to ☽ once-
★ ☾ [3 dc in next ch-3 space, dc in next 3-dc cluster] twice, sc in next ch-3 space, ch 3, skip next
★ ☾ [3 dc in next ch-3 space, dc in next 3-dc cluster] twice, sc in next ch-3 space, ch 3, skip next
ch-1 space, sc in next ch-3 space, 2-FPdc cluster around next dc,
[ch 2, 2-FPdc cluster around next dc] 4 times, sc in next ch-3 space, ch 3, skip next ch-1 space,
sc in next ch-3 space, dc in next 3-dc cluster, [3 dc in next ch-3 space, dc in next 3-dc cluster] twice,
ch 3, skip next ch-3 space, sc in next ch-3 space, ch 3 ☽, dc in next 3-dc cluster ★
Slip st to third ch of first dc.
(72 dc, 16 ch-3 spaces, 20 sc, 20 2-FPdc clusters, 16 ch-2 spaces)
Slip st to third ch of first dc.
(72 dc, 16 ch-3 spaces, 20 sc, 20 2-FPdc clusters, 16 ch-2 spaces)

How to make a 2-FPdc cluster
1- yo, insert hook from front to back around the post of the dc indicated.
2- yo and pull up a loop.
3- yo and draw through 2 loops on hook. There should be 2 loops remaining on the hook.
4- yo and insert hook from front to back around the post of the same dc, yo and pull up a loop, yo and draw through 2 loops on hook. (3 loops remaining on the hook)
5- yo and draw through all 3 loops on the hook to complete the 2-FPdc cluster.

Round 15
Ch 1, BPsc around same st, BPsc around each of next 8 dc, hdc in next ch-3 space, ch 3, dc in marked ch-3 space on Round 13 after the sc already in that space, Repeat from ★ to ★ 3 times and from ☾ to ☽ once-
★ ☾ [ch 3, dc in the space between next 2 dc on Round 13 directly below working around the
ch-2 space on Round 14] 4 times, ch 3, dc in the next ch-3 space on Round 13 before the sc already in that space, ch 3, hdc in next ch-3 space on Round 14, BPsc around each of next 9 dc, ch 5 ☽,
BPsc around each of next 9 dc, hdc in next ch-3 space, ch 3, dc in next ch-3 space on Round 13 after the sc already in that space ★
Slip st to first BPsc.
(72 BPsc, 8 hdc, 28 ch-3 spaces, 24 dc, 4 ch-5 spaces)
Slip st to first BPsc.
(72 BPsc, 8 hdc, 28 ch-3 spaces, 24 dc, 4 ch-5 spaces)

How to make a back post single crochet (BPsc)
1 and 2- Insert hook from back to front around the post of the dc indicated.
3- yo and pull up a loop.
4- yo and draw through 2 loops on hook to complete the BPsc.

How to dc between the dc sts on Round 14
1- You will be working in the 6 highlighted spaces on Round 13, working over ch-2 spaces on Round 14.
2- Make the next dc in the ch-3 space on Round 13 directly below, right before the first 2-FPdc cluster on Round 14. Try to make it after or as close as you can to the the sc that is already in that space.
3- ch 3.
4- Make the next dc between the first and second dcs on Round 13, working over the ch-2 space on Round 14.
5- [ch 3, dc in the space between next 2 dc on Round 13 directly below working around the
ch-2 space on Round 14] 3 times, ch 3.
ch-2 space on Round 14] 3 times, ch 3.
6- Make the next dc in the ch-3 space on Round 13 directly below, right after the last 2-FPdc cluster on Round 14. Try to make it before or as close as you can to the sc that is already in that space.

Round 16
Ch 1, hdc in same st, hdc in each of next 8 BPsc, 3 dc in each of next 3 ch-3 spaces, [2 tr, ch 3, 2 tr] in next ch-3 space, 3 dc in each of next 3 ch-3 spaces, skip next hdc,
hdc in each of next 9 BPsc, 5 hdc in next ch-5 space,
Repeat from ★ to ★ around-
★ hdc in each of next 9 BPsc, 3 dc in each of next 3 ch-3 spaces, [2 tr, ch 3, 2 tr] in next ch-3 space,
Repeat from ★ to ★ around-
★ hdc in each of next 9 BPsc, 3 dc in each of next 3 ch-3 spaces, [2 tr, ch 3, 2 tr] in next ch-3 space,
3 dc in each of next 3 ch-3 spaces, skip next hdc, hdc in each of next 9 BPsc,
5 hdc in next ch-5 space ★
Slip st to first hdc in the back loop only, fasten off Color 1 if you are making the border in a second color.
Slip st to first hdc in the back loop only, fasten off Color 1 if you are making the border in a second color.
For another border style skip the Picot Border round and continue with Round 17.
(92 hdc, 72 dc, 16 tr, 4 ch-3 spaces)
(92 hdc, 72 dc, 16 tr, 4 ch-3 spaces)

Picot Border
Note- For another border style skip the Picot Border round and continue with Round 17.If using a second color join in the back loop only of the same st.
Ch 1, sc-BLO (back loop only) in same st, sc-BLO in each of next 17 sts,
Repeat from ★ to ★ 3 times and from ☾ to ☽ once-
★ ☾ picot, sc-BLO in each of next 2 dc, picot, sc in first ch of next ch-3 space, in center ch of ch-3 space work- [sc, large picot, sc], sc in last ch of ch-3 space, picot, sc-BLO in each of next 2 dc, picot ☽, sc-BLO in each of next 41 sts ★
sc-BLO in each of next 23 sts, slip st to first sc, fasten off and weave in ends.
(192 sc, 16 picots, 4 large picots)
(192 sc, 16 picots, 4 large picots)

Round 17
If using a second color join in the back loop only of the same st.Ch 1, sc-BLO (back loop only) in same st, sc-BLO in each of next 19 sts, sc-BLO in first ch of next corner ch-3 space, ch 3, sc-BLO in last ch of same ch-3 space,
Repeat from ★ to ★ around-
★ sc-BLO in each of next 45 sts, sc-BLO in first ch of next corner ch-3 space, ch 3, sc-BLO in last ch of same ch-3 space ★
★ sc-BLO in each of next 45 sts, sc-BLO in first ch of next corner ch-3 space, ch 3, sc-BLO in last ch of same ch-3 space ★
sc-BLO in each of next 25 sts, slip st to first sc.
(188 sc, 4 ch-3 spaces)
(188 sc, 4 ch-3 spaces)

Round 18
Slip st in next sc, ch 3 (counts as first dc), 2 dc in same st, ch 1, [skip next 3 sc, 3 dc in next sc, ch 1] 4 times, [3 dc, ch 3, 3 dc] in next corner ch-3 space, ch 1, Repeat from ★ to ★ around-
★ [skip next 3 sc, 3 dc in next sc, ch 1] 11 times, [3 dc, ch 3, 3 dc] in next corner ch-3 space, ch 1 ★
[skip next 3 sc, 3 dc in next sc, ch 1] 6 times, slip st to third ch of first dc.
(156 dc, 48 ch-1 spaces, 4 ch-3 spaces)

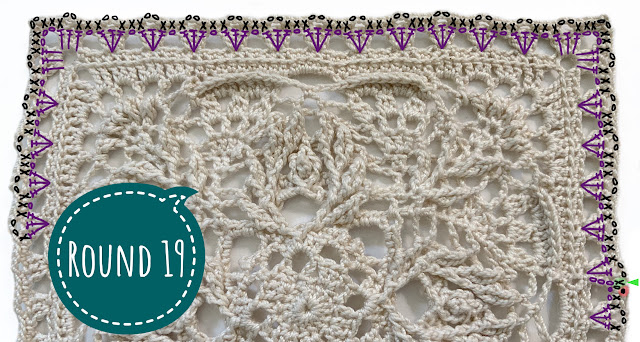
Round 19
Ch 1, sc in same st, ch 2, skip next dc, sc in next dc, [sc in next ch-1 space, sc in next dc, ch 2, skip next dc, sc in next dc] 5 times, in the next corner ch-3 space work- [2 sc, ch 2, 2 sc], Repeat from ★ to ★ around-
★ sc in next dc, ch 2, skip next dc, sc in next dc, [sc in next ch-1 space, sc in next dc, ch 2, skip next dc, sc in next dc] 12 times, in the next corner ch-3 space work- [2 sc, ch 2, 2 sc] ★
[sc in next dc, ch 2, skip next dc, sc in next dc, sc in next ch-1 space] 7 times, slip st to first sc.
(168 sc, 56 ch-2 spaces)
Round 20
Slip st into next ch-2 space, ch 5, slip st in second ch from hook (counts as first dc and small picot), In same ch-2 space work- {dc, [small picot, dc] 3 times},
ch 1, sc in next ch-2 space, ch 1,
{dc in next ch-2 space, in same ch-2 space work- [small picot, dc] 4 times, ch 1, sc in next ch-2 space, ch 1} twice,
{dc in next ch-2 space, in same ch-2 space work- [small picot, dc] 4 times, ch 1, sc in next ch-2 space, ch 1} twice,
Repeat from ★ to ★ 3 times and from ☾ to ☽ once-
★ ☾ In next corner ch-2 space work- {dc, [small picot, dc] 5 times},
★ ☾ In next corner ch-2 space work- {dc, [small picot, dc] 5 times},
ch 1, sc in next ch-2 space, ch 1 ☽,
{dc in next ch-2 space, in same ch-2 space work- [small picot, dc] 4 times, ch 1, sc in next ch-2 space, ch 1} 6 times ★
{dc in next ch-2 space, in same ch-2 space work- [small picot, dc] 4 times, ch 1, sc in next ch-2 space, ch 1} 3 times,
Slip st to third ch of first dc, fasten off and weave in ends.
(28 sc, 144 dc,116 small picots, 56 ch-1 spaces)

Blocking and Finishing
It is optional but recommended to block your finished piece. Fill a bowl with water and add some liquid starch if you prefer the doily to be lightly stiffened. Soak and gently press out any excess liquid, being careful not to pull or twist on the stitches. Lay it flat on a blocking mat and pin the doily working from the center out to the edges. Allow to dry completely before removing the pins.

Related Patterns
If you enjoyed this pattern you might also like-


This pattern is by Julia Hart of Draiguna. Feel free to link to this pattern but do not reprint it onto your website. You can sell items made from this pattern. Please credit me as the designer, Julia Hart of Draiguna, link to my etsy shop- draiguna.etsy.com, or to my blog- www.draiguna.com. Please do not claim this pattern as your own, sell, or distribute it. This includes making charts, graphs, or videos. Thank you!
© 2021 Draiguna
Thank you! Very beautiful!
ReplyDeletePrzepiękne. Zestaw kolorów super
ReplyDeleteThank you so much!! This was a fantastic challenge for me, and it was very worth the work! Love your patterns and hope to do more soon!
ReplyDeleteyou are so nice sharing all the patterns. thank you. much love from the Philippines
ReplyDeleteI love this so much because of the border you added. Are there instructions for the border?
ReplyDeleteHi thank you so much for sharing! I have a question: how to connect the squares? Thank you! :)
ReplyDeleteI do it and I love this square, thank you for free sharing this pattern
ReplyDeleteThank you so much for this lovingly made, photographed, painted in and explained pattern. Haven’t tried it but will. It seems absolutely doable even for a newbie❣️
ReplyDeleteI believe there is a mistake in Round 3 of the written instructions: Should say
ReplyDelete★ 5 dc in next ch-3 space, ch3, skip next 2 dc, sc in next dc, ch 3 ★
Happy Granny Square Day! The Sylvanweave Square looks absolutely beautiful—those Olive and Ecru colors work so well together and really highlight the stitch texture. Thank you for sharing the pattern and yarn details; it’s always helpful for fellow crocheters who want to try it out. Creative inspiration like this is as valuable in crafting as clear guidance is in academics, which is why a law assignment writing service can be so helpful when precision and structure matter most.
ReplyDeleteVisit: https://bestassignmenthelpau.com/law-assignment-help-australia/
As a student dealing with complex diagrams and system designs, finding the right support makes all the difference. That's exactly why I turned to professional UML assignment help UK services, and honestly, it was the best decision. The experts broke down every concept clearly, from use case diagrams to sequence and class diagrams. What impressed me most was their attention to detail, quick turnaround, and affordable pricing. If you are struggling with your UML assignments and need trusted academic support, I highly recommend giving these services a try. Your grades will thank you!
ReplyDelete