
This textured snowflake pattern has 8 rounds and measures about 3 3/4". For this one I replaced the pineapples that were in the the Winter Realm snowflake with hearts! The texture is added by working around the posts of the dc stitches instead of in them. The thread I used for the snowflakes pictured is Aunt Lydia's size 10 cotton crochet thread in the colors Ecru, Orchid Pink, Peach, and Aqua.
There is also an ad-free printable version of this pattern in the ebook Winterwoven Snowflakes.
It is available to purchase in my Ravelry Store and Etsy shop here-

___________________________________________________________________________________
This post contains affiliate links. If you choose to make a purchase I earn a small commission at no extra cost to you. Thank you for your support!
Winter Hearts Snowflake

This pattern has 8 rounds and measures about 3 3/4".
Pattern is written using U.S. Terminology.
Materials Needed
size 10 crochet thread- 20-40 yards
1.75 mm hook
yarn needle
scissors
Stitch Abbreviations
ch(s)- chain(s)
dc- double crochet
FPdc- front post double crochet
FPsc- front post single crochet
slip st- slip stitch
sc- single crochet
st(s)- stitch(es)
tr- treble crochet
yo- yarn over
Special Stitches
2-FPdc decrease- ❄ yo, insert hook from front to back around post of next st indicated and pull up a loop, yo and draw through 2 loops on hook, repeat from ❄ once more, yo and draw through all 3 loops on hook.
3-FPdc decrease- ❄ yo, insert hook from front to back around post of next st indicated and pull up a loop, yo and draw through 2 loops on hook, repeat from ❄ 2 times more, yo and draw through all 4 loops on hook.
2-tr decrease- (uses next 2 ch-5 spaces on Round 6), yo twice and insert hook from front to back in first ch-5 space indicated and pull up a loop, [yo and draw through 2 loops on hook] twice, yo twice and insert hook from back to front in next ch-5 space and pull up a loop, [yo and draw through 2 loops on hook] twice, yo and draw though all 3 loops on hook.
small picot- ch 2, slip st in last sc made.
2-dc cluster- [yo and insert hook into ch indicated and pull up a loop, draw through 2 loops on hook] twice, yo and draw through all 3 loops on hook.
Pattern Notes
[ ] , { } - work enclosed instructions the amount of times indicated, or work enclosed instructions in the stitch or space indicated.
❄ - repeat the following instructions the amount of times indicated.
( ) - Enclose additional information.
Symbol Key

Round 1
ch 6 (counts as foundation ch, first dc and ch-2 space), in 6th ch from hook work- [dc, ch 2] 5 times, slip st to third ch of first dc.
(6 dc, 6 ch-2 spaces)


Round 2
ch 1, FPdc around same st, ch 3, [FPdc around next dc, ch 3] around, slip st to first FPdc.
(6 FPdc, 6 ch-3 spaces)

How to make a FPdc (front post double crochet)
1- yo and insert hook from front to back around the post of the dc indicated.
2- yo and pull up a loop. (3 loops on hook)
3- yo and draw through 2 loops on hook. (2 loops on hook)
4- yo and draw through 2 loops on hook once more to complete the FPdc.

Round 3
ch 1, 3 FPdc around same st, ch 1, sc around ch-2 space on Round 1 and ch-3 space on Round 2 together as 1 st, ch 1,
❄ 3 FPdc around next FPdc, ch 1, sc around ch-2 space on Round 1 and ch-3 space on Round 2 together as 1 st, ch 1, repeat from ❄ around, slip st to first FPdc.
(18 FPdc, 12 ch-1 spaces, 6 sc)

sc around ch-2 space on Round 1 and ch-3 space on Round 2 together as 1 st
1- insert hook under the chs of the ch-2 space on Round 1 and the ch-3 space on Round 2.
2- yo and pull up a loop, yo and draw through both loops to complete the sc.

Round 4
ch 1, 2 FPdc around same st, FPdc around next FPdc, 2 FPdc around next FPdc (optional- work second FPdc behind the first FPdc made), ch 1,
❄ 2 FPdc around next FPdc, FPdc around next FPdc, 2 FPdc around next FPdc (optional- work second FPdc behind the first FPdc made), ch 1, repeat from ❄ around, slip st to first FPdc.
(30 FPdc, 6 ch-1 spaces)

optional- work second FPdc behind the first FPdc made
1- Slide the last FPdc made forward so you can work behind it. Yo and insert hook from front to back around the same FPdc as last FPdc made.
2- yo and pull up a loop, [yo and pull through 2 loops on hook] twice to complete the FPdc.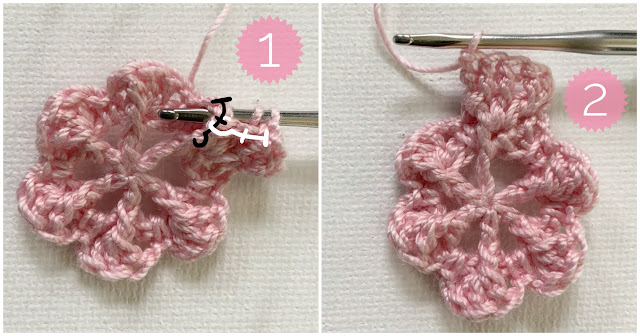
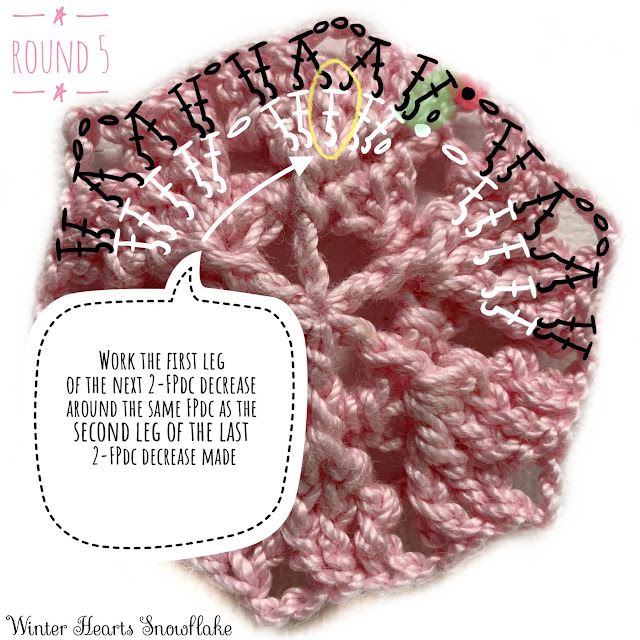
Round 5
ch 1, 2 FPdc around same st, 2-FPdc decrease around next 2 FPdc, ch 3, 2-FPdc decrease around same FPdc and next FPdc, 2 FPdc around next FPdc (optional- work second FPdc behind the first FPdc made), ch 1,
❄ 2 FPdc around next FPdc, 2-FPdc decrease around next 2 FPdc, ch 3, 2-FPdc decrease around same FPdc and next FPdc, 2 FPdc around next FPdc (optional- work second FPdc behind the first FPdc made), ch 1, repeat from ❄ around, slip st to first FPdc.
(24 FPdc, 12 2-FPdc decreases, 6 ch-3 spaces, 6 ch-1 spaces)
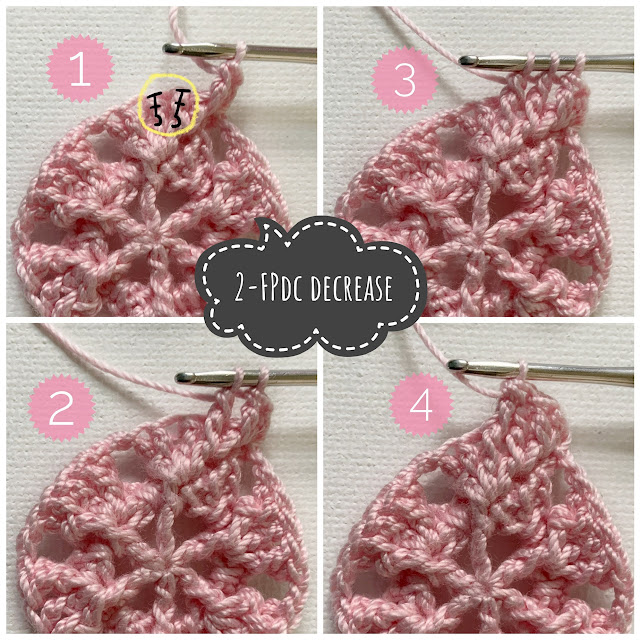
2-FPdc decrease
1- You will be working around the next 2 FPdc indicated in the first picture.
2- keeping last loop of each FPdc on hook, FPdc around the first st indicated. (2 loops on hook)
3- FPdc around the second st indicated. (3 loops on hook)
4- yo and draw through all 3 loops on hook to complete the 2-FPdc decrease.
Round 6
ch 1, 3-FPdc decrease around same st and next 2 FP sts, ch 5, sc in next ch-3 space, ch 5, 3-FPdc decrease around next 3 FP sts, ch 2,
❄ 3-FPdc decrease around next 3 FP sts, ch 5, sc in next ch-3 space, ch 5, 3-FPdc decrease around next 3 FP sts, ch 2, repeat from ❄ around, slip st to first 3-FPdc decrease.
Mark first ch-5 space made for st placement on Round 8.
Mark first ch-2 space made for st placement on Round 8.
(12 3-FPdc decreases, 12 ch-5 spaces, 6 sc, 6 ch-2 spaces)

3-FPdc decrease
1- You will be working around the next 3 FP sts indicated in the first picture.
2- keeping last loop of each FPdc on hook, FPdc around the first st indicated. (2 loops on hook)
3- FPdc around the second st indicated. (3 loops on hook)
4- FPdc around the third st indicated. (4 loops on hook)
5- yo and draw through all 4 loops on hook to complete the 3-FPdc decrease.
Round 7
slip st into next ch-5 space, ch 1, 3 sc in same space, ch 5, 3 sc in next ch-5 space, ch 3, skip next ch-2 space, [3 sc in next ch-5 space, ch 5, 3 sc in next ch-5 space, ch 3, skip next ch-2 space] around, slip st to first sc.
(36 sc, 6 ch-5 spaces, 6 ch-3 spaces)

Round 8
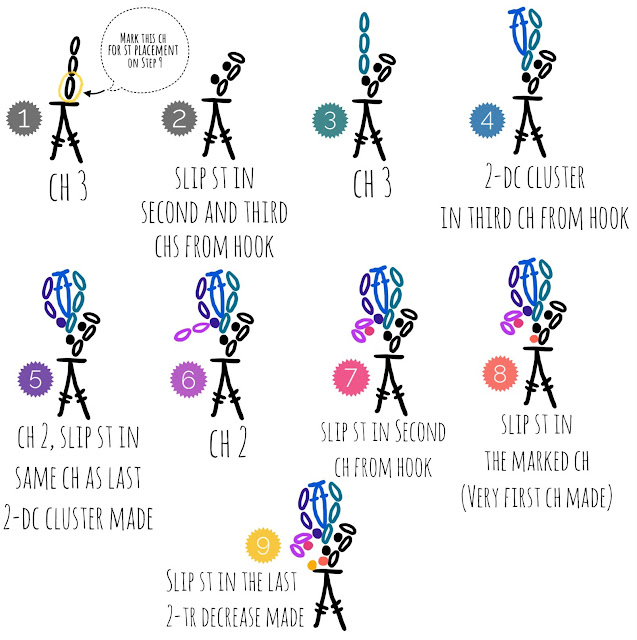
ch 1, sc in same st, sc in each of next 2 sc, ch 2, slip st in last sc made (small picot made), 3 sc in next ch-5 space, 2-tr decrease using the marked ch-5 space on Round 6 after the 3 sc already in that space and next ch-5 space on Round 6 before the 3 sc already in that space,
{ch 3 (mark the third ch made for st placement), slip st in second and third ch from hook, ch 3, 2-dc cluster in third ch from hook, ch 2, slip st in same ch as last 2-dc cluster made, ch 2, slip st in second ch from hook and in the marked ch made after the 2-tr decrease, slip st in the last 2-tr decrease made, 3 sc in same ch-5 space on Round 7, small picot, sc in each of next 3 sc, sc in next ch-3 space, ch 1},
slip st in marked ch-2 space on Round 6 directly below, ch 1, sc in same ch-3 space on Round 7,
❄ sc in each of next 3 sc, small picot, 3 sc in next ch-5 space, 2-tr decrease using the next ch-5 space on Round 6 after the 3 sc already in that space, and and next ch-5 space on Round 6 before the 3 sc already in that space, repeat from { to } once, slip st in next ch-2 space on Round 6 directly below, ch 1, sc in same ch-3 space on Round 7, repeat from ❄ around, slip st to first sc, fasten off and weave in ends.
(84 sc, 12 small picots, 6 2-tr decreases, 6 2-dc clusters)

2-tr decrease
1- yo twice. You will be working in the 2 ch-5 spaces on Round 6 indicated in the first picture.
2 and 3- keeping last loop of each tr on hook, tr in the first ch-5 space indicated on Round 6 after the 3 sc already in that space.
4- tr in the second ch-5 indicated on Round 6 before the 3 sc already in that space.
5- yo and draw through all 3 loops on hook to complete the 2-tr decrease.

How to make the point
Blocking and Finishing
It is optional but recommended to block your finished piece. Soak the snowflake in liquid starch or dilute with water if you prefer it to be lightly stiffened. Gently press out any excess liquid, being careful not to pull or twist on the stitches. Lay it flat on a blocking mat and pin the snowflake working from the center out to the edges. Allow to dry completely before removing the pins.


Related Patterns
If you enjoyed this pattern, you might also like-


There are more free snowflake patterns available here-
This pattern is by Julia Hart of Draiguna. Feel free to link to this pattern but do not reprint it onto your website. You can sell items made from this pattern. Please credit me as the designer, Julia Hart of Draiguna, link to my etsy shop- draiguna.etsy.com, or to my blog- www.draiguna.com. Please do not claim this pattern as your own, sell, or distribute it. Thank you!
© 2020 Draiguna
Do you have youtube video's for these snowflake patterns? Thank you!
ReplyDeleteI was looking for the name of the little , tiny snowflake. I have a whole bunch from one of my subscriptions. But have never seen the tiny one before. All Beautiful.
ReplyDeleteMy email was up before,during and after my comment. Happy crocheting.
ReplyDeleteI have never seen such clear and comprehensive instructions for a needle work project in my life. Thank you so much for all the work you have put in to this pattern. It will look beautiful on the tree this Christmas!
ReplyDelete