
Vampiric Candle
This pattern has 37 rounds.
Finished size- 2 1/2" tall.
Pattern is written using U.S. Terminology.
Materials Needed
size 10 crochet thread in 4 colors-
Color 1 (Grey) - 40-50 yards
Color 2 (Natural) - 25-35 yards
Color 3 (Black) - a small amount
Color 4- (Red) - a small amount
1.75 mm hook
Yarn needle
Scissors
A small amount of fiberfill or scraps of crochet thread for stuffing the candle.
Optional- Stitch marker
Optional- liquid starch for blocking
Stitch Abbreviations
BLO- back loop only
ch(s)- chain(s)
dc- double crochet
hdc- half double crochet
FLO- front loop only
RS- right side
sc- single crochet
st(s)- stitch(es)
WS- wrong side
yo- yarn over
Special Stitches
Picot- ch 4, slip st in second ch from hook.
2-sc decrease- [insert hook in next st indicated, yo and pull up a loop] twice, yo and draw through all 3 loops on hook.
Pattern Notes
[ ] - work enclosed instructions the amount of times indicated, or work enclosed instructions in or around the stitch or space indicated.
★ - repeat from ★ to ★ the amount of times indicated.
( ) - Enclose additional information and the amount of stitches at the end of each round or row.
Do not join at the end of a round unless otherwise stated.
Symbol Key

Instructions
Round 1
Note- Do not join at the end of a round unless otherwise stated.
With Color 1- Ch 2, 6 sc in second ch from hook.
(6 sc)

Round 2
Repeat from ★ to ★ 6 times-
★ 2 sc in next sc ★
(12 sc)

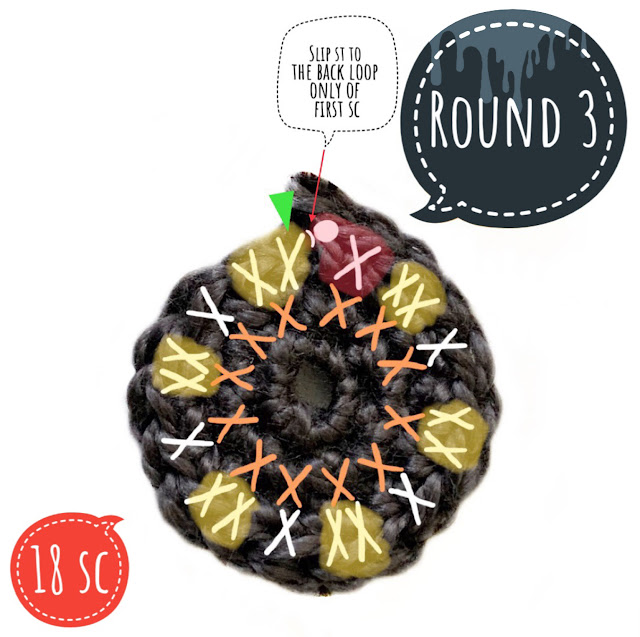
Round 3
Repeat from ★ to ★ 6 times-
★ 2 sc in next sc, sc in next sc ★
Join- Slip st to the BLO (back loop only) of first sc.
(18 sc)
Round 4
Work all of following sc sts in the BLO (back loop only)-
Ch 1, sc-BLO in same sc, sc-BLO in each of next 17 sc.
(18 sc)

Round 5
Repeat from ★ to ★ 6 times-
★ 2 sc in next sc, sc in each of next 2 sc ★
(24 sc)

Round 6
Repeat from ★ to ★ 6 times-
★ 2 sc in next sc, sc in each of next 3 sc ★
(30 sc)

Round 7
Repeat from ★ to ★ 6 times-
★ 2 sc in next sc, sc in each of next 4 sc ★
(36 sc)

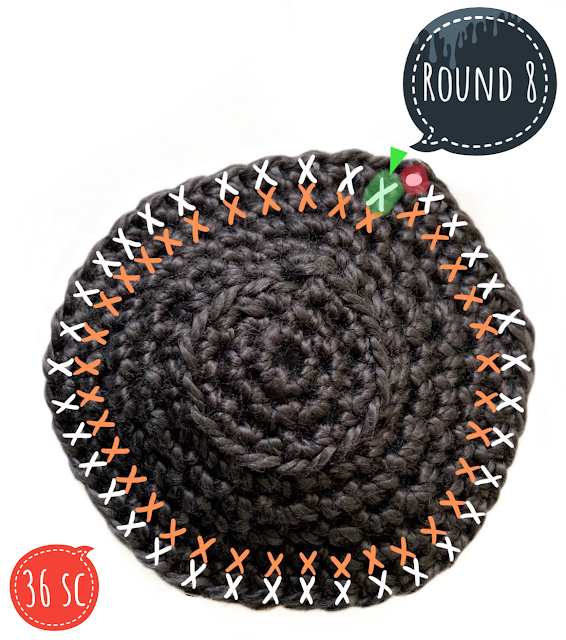
Round 8
sc in each of next 36 sc,
Join- Slip st to first sc.
(36 sc)
Round 9
Ch 1, sc in same sc, ch 3, skip next sc, [dc, ch 3, dc] in next sc,
Repeat from ★ to ★ around-
★ ch 3, skip next sc, sc in next sc, ch 3, skip next sc, [dc, ch 3, dc] in next sc ★
Join- Ch 1, hdc in first sc to make last ch-3 space.
(9 sc, 27 ch-3 spaces, 18 dc)

Round 10
Ch 1, sc in same ch-3 space, ch 4, slip st in third ch from hook (picot made), ch 2, sc in next ch-3 space, [2 sc, ch 1, 2 sc] in next ch-3 space,
Repeat from ★ to ★ around-
★ sc in next ch-3 space, picot, ch 2, sc in next ch-3 space, [2 sc, ch 1, 2 sc] in next ch-3 space ★
Join- Slip st to first sc, fasten off and weave in ends.
(54 sc, 9 picots, 9 ch-2 spaces)

Round 11
Note- You will be working clockwise so that the RS (right side) of your work is facing out.
Join Color 1 in free loop of any sc on Round 3, ch 1, sc in same st,
Working in the free loop of each sc on Round 3- sc in each of the next 17 sc.
(18 sc)

Joining Color 1 in the free loop on Round 3
1- You will be working in the free front loops of the scs on Round 3 indicated in the first photo.
2- Insert hook into one of the loops on Round 3, loop Color 1 around the hook.
3- Pull through.
4- ch 1, insert hook into same loop, yo and pull up a loop, yo and draw through 2 loops on hook to complete the first sc.

Rounds 12-15
sc in each of next 18 sc.
Join at the end of Round 15- Slip st to the FLO (front loop only) of next sc.
(18 sc)

Round 16
Work all of following sc sts in the FLO (front loop only)-
Ch 1, sc-FLO in same sc, sc-FLO in each of next 17 sc.
(18 sc)

Round 17
Repeat from ★ to ★ 6 times-
★ 2 sc in next sc, sc in each of next 2 sc ★
(24 sc)

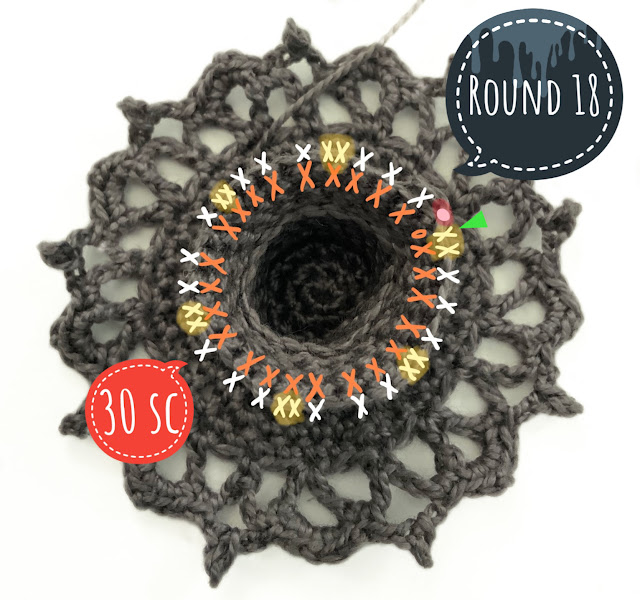
Round 18
Repeat from ★ to ★ 6 times-
★ 2 sc in next sc, sc in each of next 3 sc ★
Join- Slip st to first sc.
(30 sc)
Round 19
Ch 1, sc in same st, ch 2, skip next sc,
Repeat from ★ to ★ around-
★ sc in next sc, ch 2, skip next sc ★
Join- Slip st to first sc, fasten off and weave in ends.
(15 sc, 15 ch-2 spaces)

Round 20
Fold down Rounds 16-19 so that the free loops (the back loops of the scs) on Round 15 are at the top. You will be working clockwise so that the RS (right side) of your work is facing out.
Join Color 2 in free loop of any sc on Round 15, ch 1, sc in same st,
Working in the free loop of each sc on Round 15- sc in each of the next 17 sc.
(18 sc)

Rounds 21-28
sc in each of next 18 sc
(18 sc)

Rounds 29-35
sc in each of next 9 sc,
hdc in each of next 9 sts.
Join at the end of Round 35- Slip st to the BLO of first sc.
(9 sc, 9 hdc)

Stuffing the candle
Place the filling material inside the candle. You can use the end of your crochet hook to push the filling all the way down.

Round 36
Ch 1, Working all sts of this round in the BLO-
sc-BLO in same st, 2-sc decrease-BLO in next 2 sts,
Repeat from ★ to ★ 5 times-
★ sc-BLO in next sc, 2-sc decrease-BLO in next 2 sts ★
(6 sc, 6 2-sc decreases)

How to make a 2-sc decrease-BLO
1- Insert hook in the back loop only of the first sc indicated.
2- yo and pull up a loop.
3- Insert hook in the back loop only of the second sc indicated, yo and pull up a loop.
4- yo and draw through all 3 loops on the hook.
Round 37
[2-sc decrease in next 2 sts] 6 times,
Join- Slip st to first 2-sc decrease, fasten off and weave in ends.
(6 2-sc decreases)

Wick
With Color 3 ch 5, slip st in second ch from hook, slip st in each of next 3 chs, fasten off.
Attach the wick to the top of the candle- Weave in one of the ends. Thread the second end onto the yarn needle and attach to the top of the candle in the center. Insert the yarn needle into the hole in the center and out through one of the 2-sc decreases on Round 37. Weave the thread in and out through each of the 2-sc decreases. Pull to close the center around the wick. Insert the yarn needle down through the candle and out through Round 11 (the first round using Color 2) and pull so the top of the candle slightly indents. Finish weaving in the end and fasten off.

Attaching the Wick
1 and 2- Insert the yarn needle into the hole in the center and out through one of the 2-sc decreases on Round 37
3- Continue weaving the thread in and out through each of the 2-sc decreases. Pull to close the center around the wick.
4 and 5- Insert the yarn needle down through the candle and out through Round 11 and pull tight so the top of the candle slightly indents. Finish weaving in the end and fasten off.

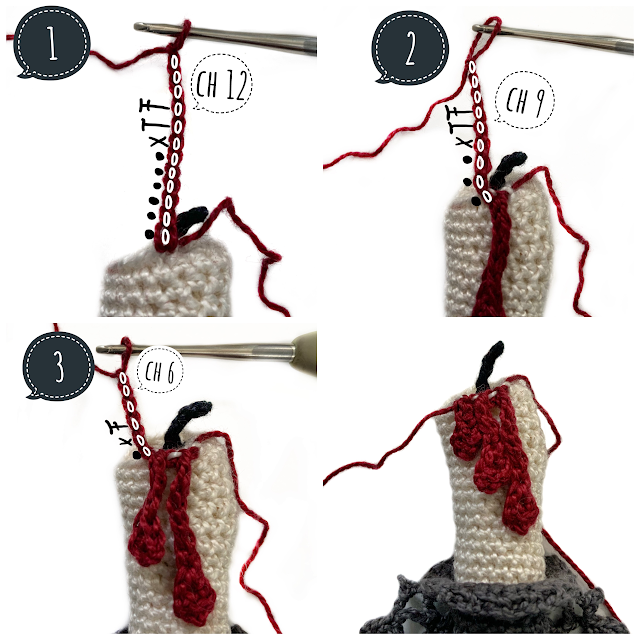
Dripping Wax
You will be working in the free loops of the first 4 sts on Round 35. Join Color 4 in free loop of first sc made on Round 35.

Row 1
Join Color 4 in free loop of first sc made on Round 35.
Ch 12, dc in fourth ch from hook, hdc in next ch, sc in next ch, slip st in each of next 6 chs,
Slip st free loop of next st on Round 35.
(1 dc, 1 hdc, 1 sc, 7 slip sts)
Row 2
Ch 9, dc in fourth ch from hook, hdc in next ch, sc in next ch, slip st in each of next 3 chs,
Slip st in free loop of next st on Round 35.
(1 dc, 1 hdc, 1 sc, 4 slip sts)
Row 3
Ch 6, dc in fourth ch from hook, sc in next ch, slip st in next ch,
Slip st in free loop of next st on Round 35, fasten off and weave in ends.
(1 dc, 1 sc, 2 slip sts)
Blocking and Finishing
It is optional but recommended to block your finished piece. Soak the candle in liquid starch or dilute with water if you prefer it to be lightly stiffened. Gently press out any excess liquid being careful not to pull or twist on the stitches. Place it onto a blocking mat and pin the edges on the bottom of the candle down. Allow to dry completely before removing the pins.
Tip- To give the candle holder more of a curved shape roll a small piece of cling wrap into a ball and place it underneath the candle before pinning to the blocking mat.


This pattern is by Julia Hart of Draiguna. Feel free to link to this pattern but do not reprint it onto your website. You can sell items made from this pattern. Please credit me as the designer, Julia Hart of Draiguna, link to my etsy shop- draiguna.etsy.com, or to my blog- www.draiguna.com. Please do not claim this pattern as your own, sell, or distribute it. Also, please do not make charts, graphs, or videos of this pattern. Thank you!
© 2021 Draiguna
What a fun and different piece, I love it! I'm picturing adding some wool roving for a little flame ^_^
ReplyDeleteTwilight fans will appreciate
ReplyDeleteI just found your website, I have a doily my grandma made and it is my favourite thing to display in my house. I love everything you have but this little candle is so stinkin cute I will definitely be working on it shortly. I might add a puff of flame with roving as well. Thank you for sharing your sharing your impressive skills in teaching this!!
ReplyDeleteThe Vampiric Candle showcased on Draiguna’s blog offers a uniquely eerie aesthetic perfect for gothic decor lovers. While the focus is on handcrafted artistry, it’s essential to remember that protecting valuable and rare collectibles also matters. That’s where a professional security service birmingham can make all the difference. Ensuring your home and prized possessions are secure adds peace of mind to the beauty they bring. Pairing artistic elegance with reliable protection truly elevates your space.
ReplyDeleteAfter finishing the delicate details of the Vampiric Candle crochet, I took a break and reached for my women leather wallet from FamilyLeather. The smooth, supple leather felt luxurious in my hand as I pulled out a few dollars to grab a coffee. Crafted with precision and elegance, this wallet has become my go-to accessory—practical yet stylish, just like the handmade creations I enjoy making.
ReplyDeleteInteresting
ReplyDeleteI just discovered the Vampiric Candle Crochet pattern by Julia Hart and it is cheesy awesome! The elements in each round and the sculpted shape bring the candle to life — I especially love the clever use of back/front loop stitches and the layered parts like the dripping wax and wick. Projects like this are wonderful ways to keep kids (and their parents!) busy learning a creative activity at home. Parents looking to mix the arts with academics may find that they can do fiber arts while enrolling their child in the best online schools k 12 free lending it to some balance in learning towards the arts as well. It's not surprising how well education and creativity go hand-in-hand when we think about the elements and combine them with the best learning approaches!
ReplyDeleteReally enjoyed the clarity and depth of this post—great job breaking the topic down in such an understandable way! I’m excited to see more of your work. If you ever need support with research paper publishing services, don’t hesitate to connect with us at Journal Publication House.
ReplyDeleteThe Vampiric Candle is such a striking addition for anyone who loves gothic or mystical décor—it instantly sets a moody, enchanting vibe. Perfect for themed rooms, Halloween, or collectors looking for something unique. Before buying, browsing viva street.uk can help you find reliable sellers and make sure your purchase is safe.
ReplyDeleteAfter completing the final stitches on my crochet project, I took a short break and reached for my women leather wallet from Lammberg Leather. The smooth, premium feel of the leather immediately stood out, reflecting the care and craftsmanship behind it. It is an accessory that combines elegance with everyday practicality, fitting seamlessly into my routine. Just like handmade creations, a well crafted leather piece carries its own character, and this wallet has become a reliable and stylish companion for my daily moments.
ReplyDeleteGet ahead with BoostMyGrade, your trusted partner when you need someone to do my online class. We provide expert academic support designed to take the pressure off your shoulders, handling everything from weekly assignments and interactive discussions to high-stakes quizzes and final exams.
ReplyDeleteOnlineClassHelp.us.com is your trusted partner for help with online class challenges. We provide reliable, expert assistance to ensure you succeed in your virtual courses with ease and confidence. Whether it’s coursework, assignments, or exam preparation, we’re here to support your academic journey every step of the way.
ReplyDelete